OpenRouter Setup
OpenRouter is the AI provider that VaultRAG uses to connect to models from OpenAI, Anthropic, Google, and more. This walkthrough covers how to create an account, configure your privacy settings, add credits, and generate an API key.
Step 1: Sign Up
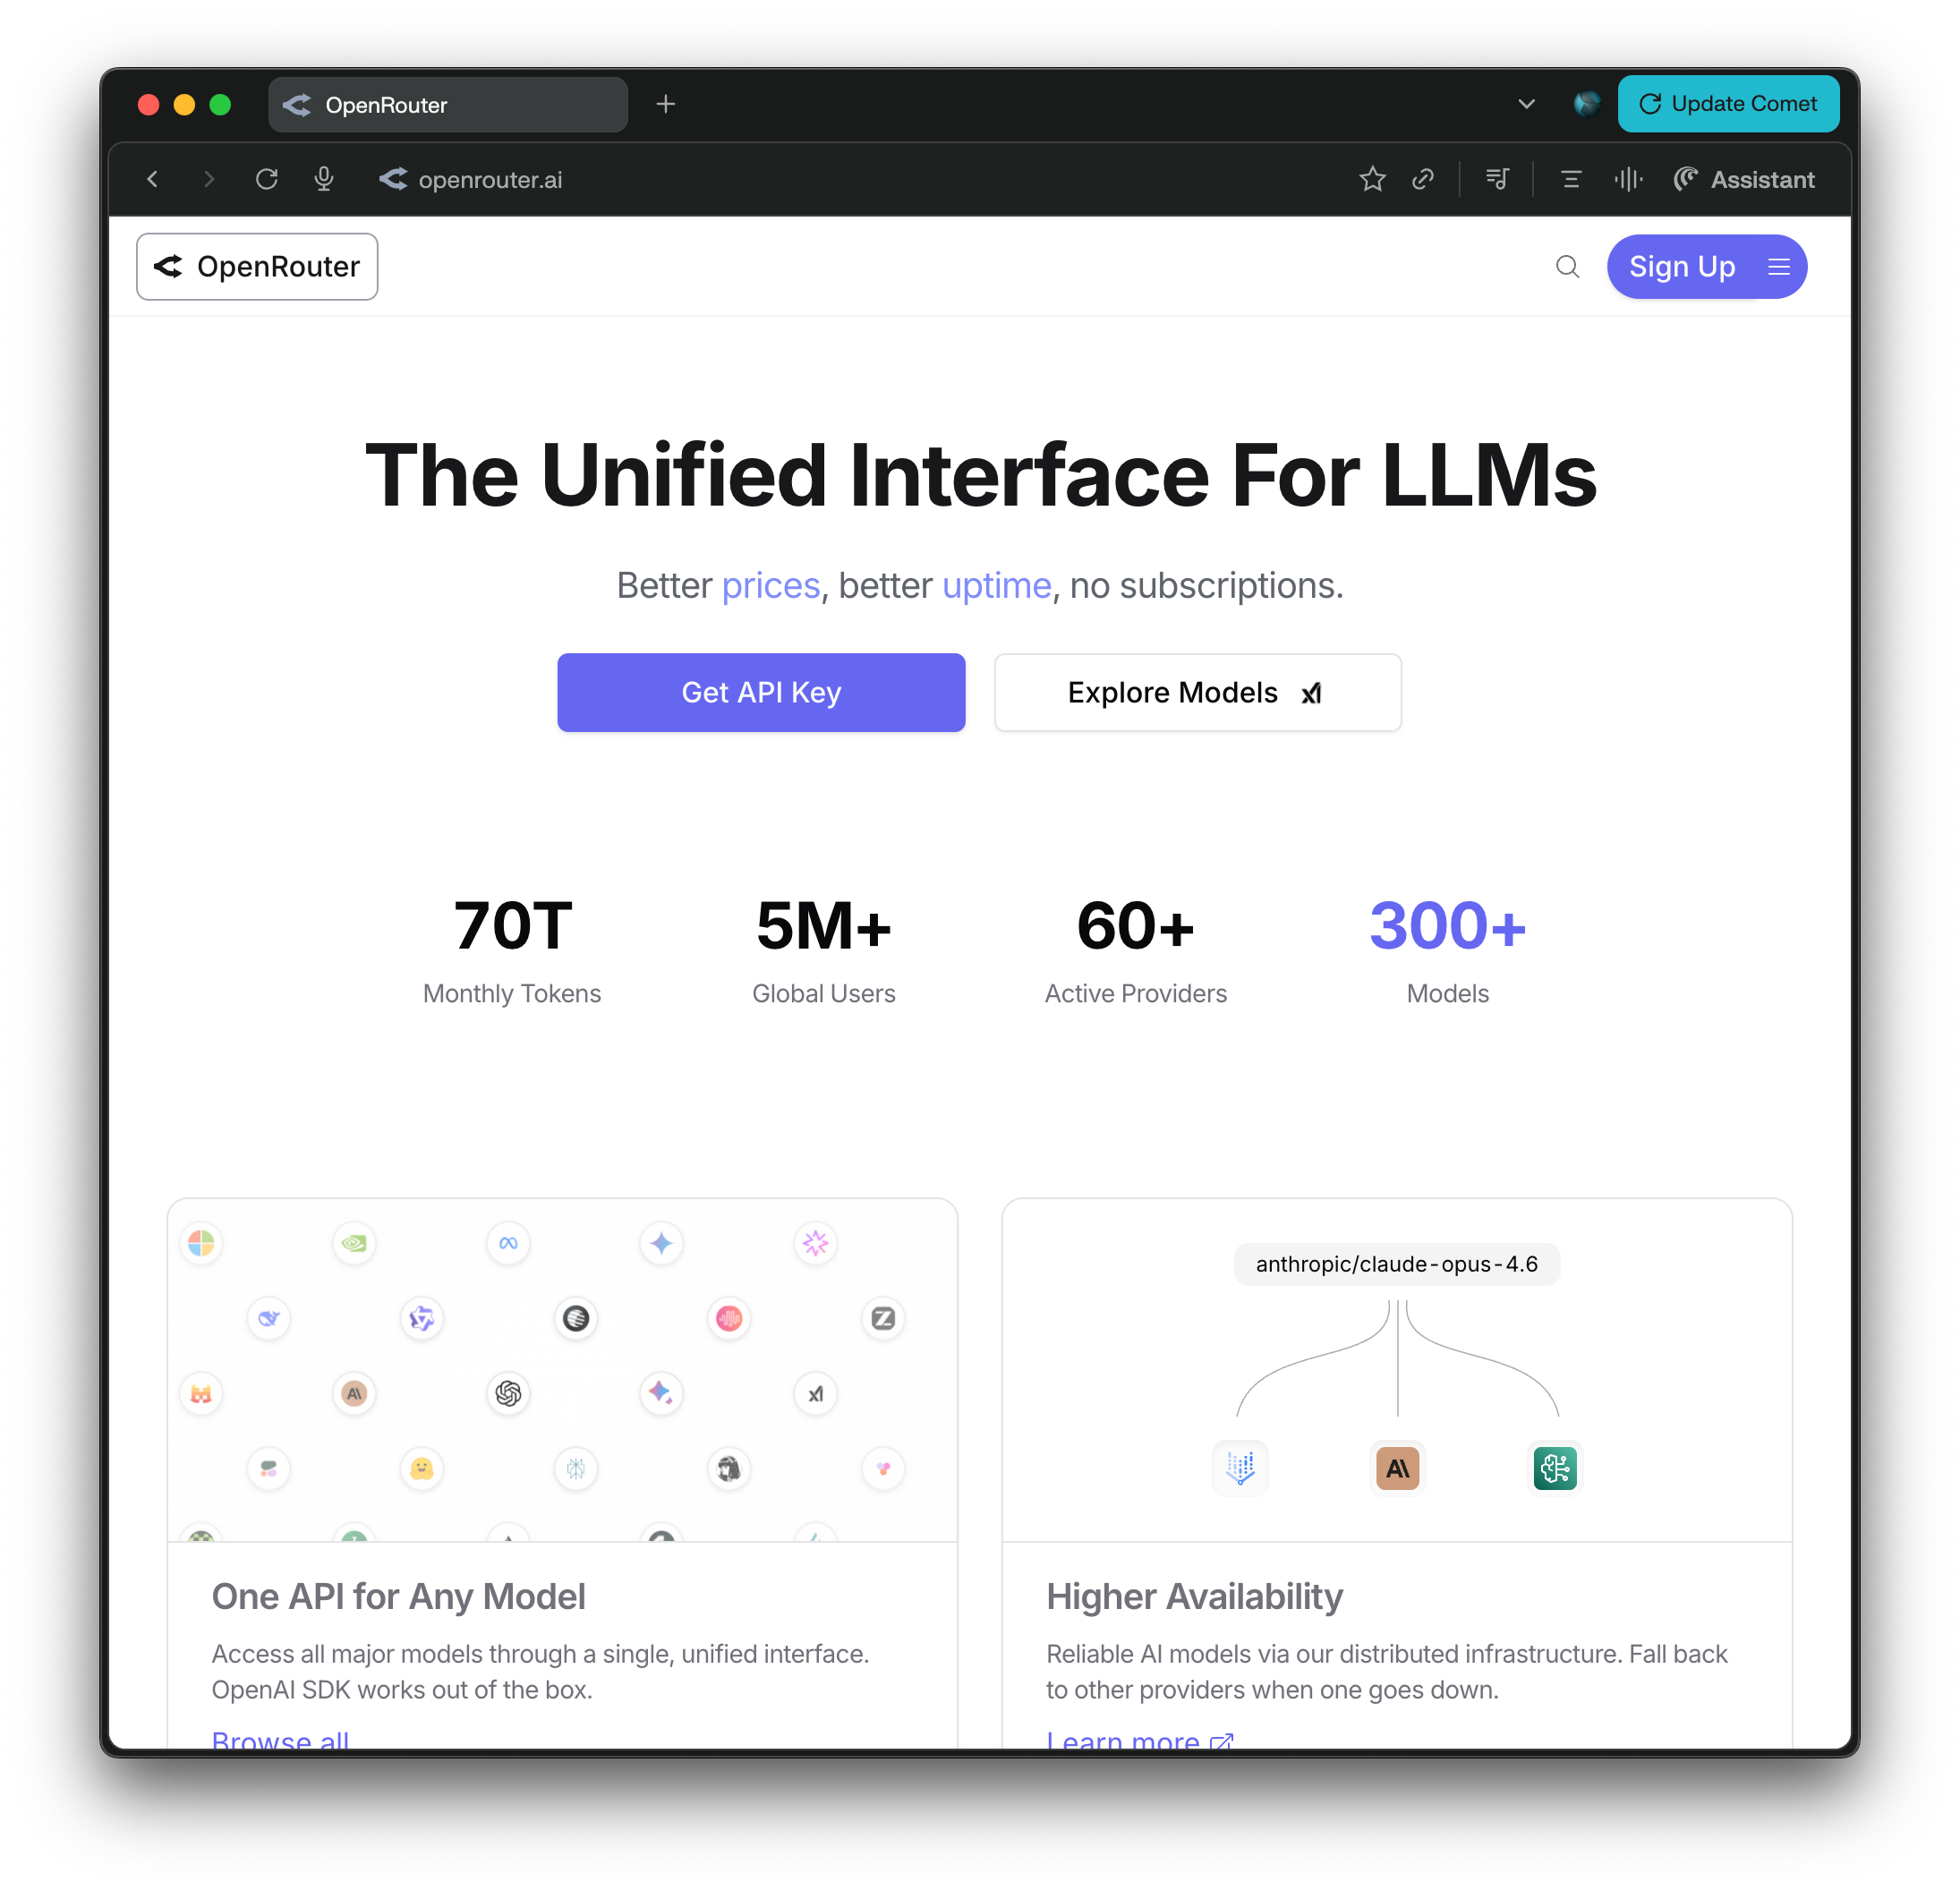
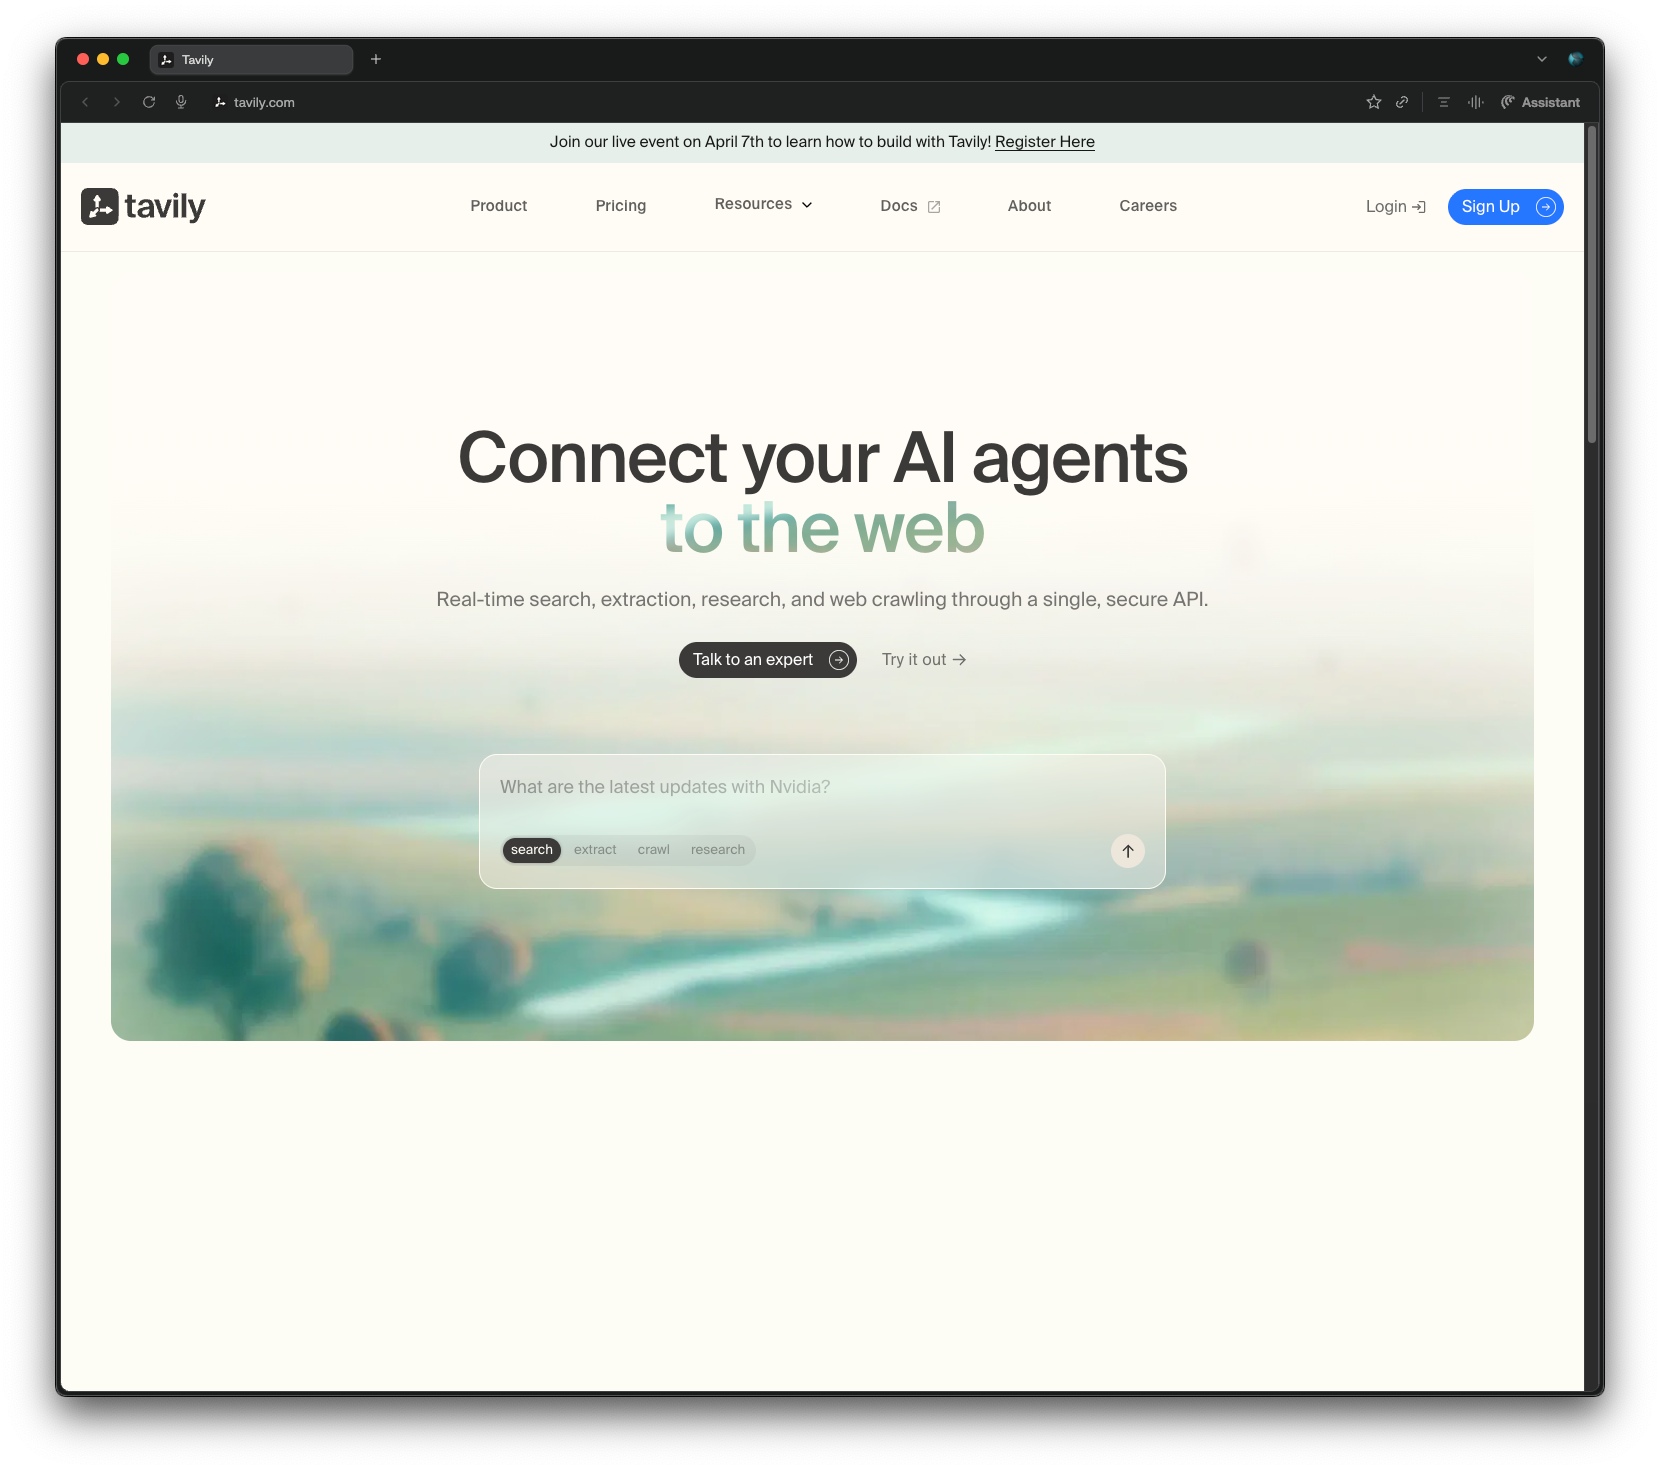
Go to openrouter.ai and click the Sign Up button in the top right corner.
Step 2: Open Settings
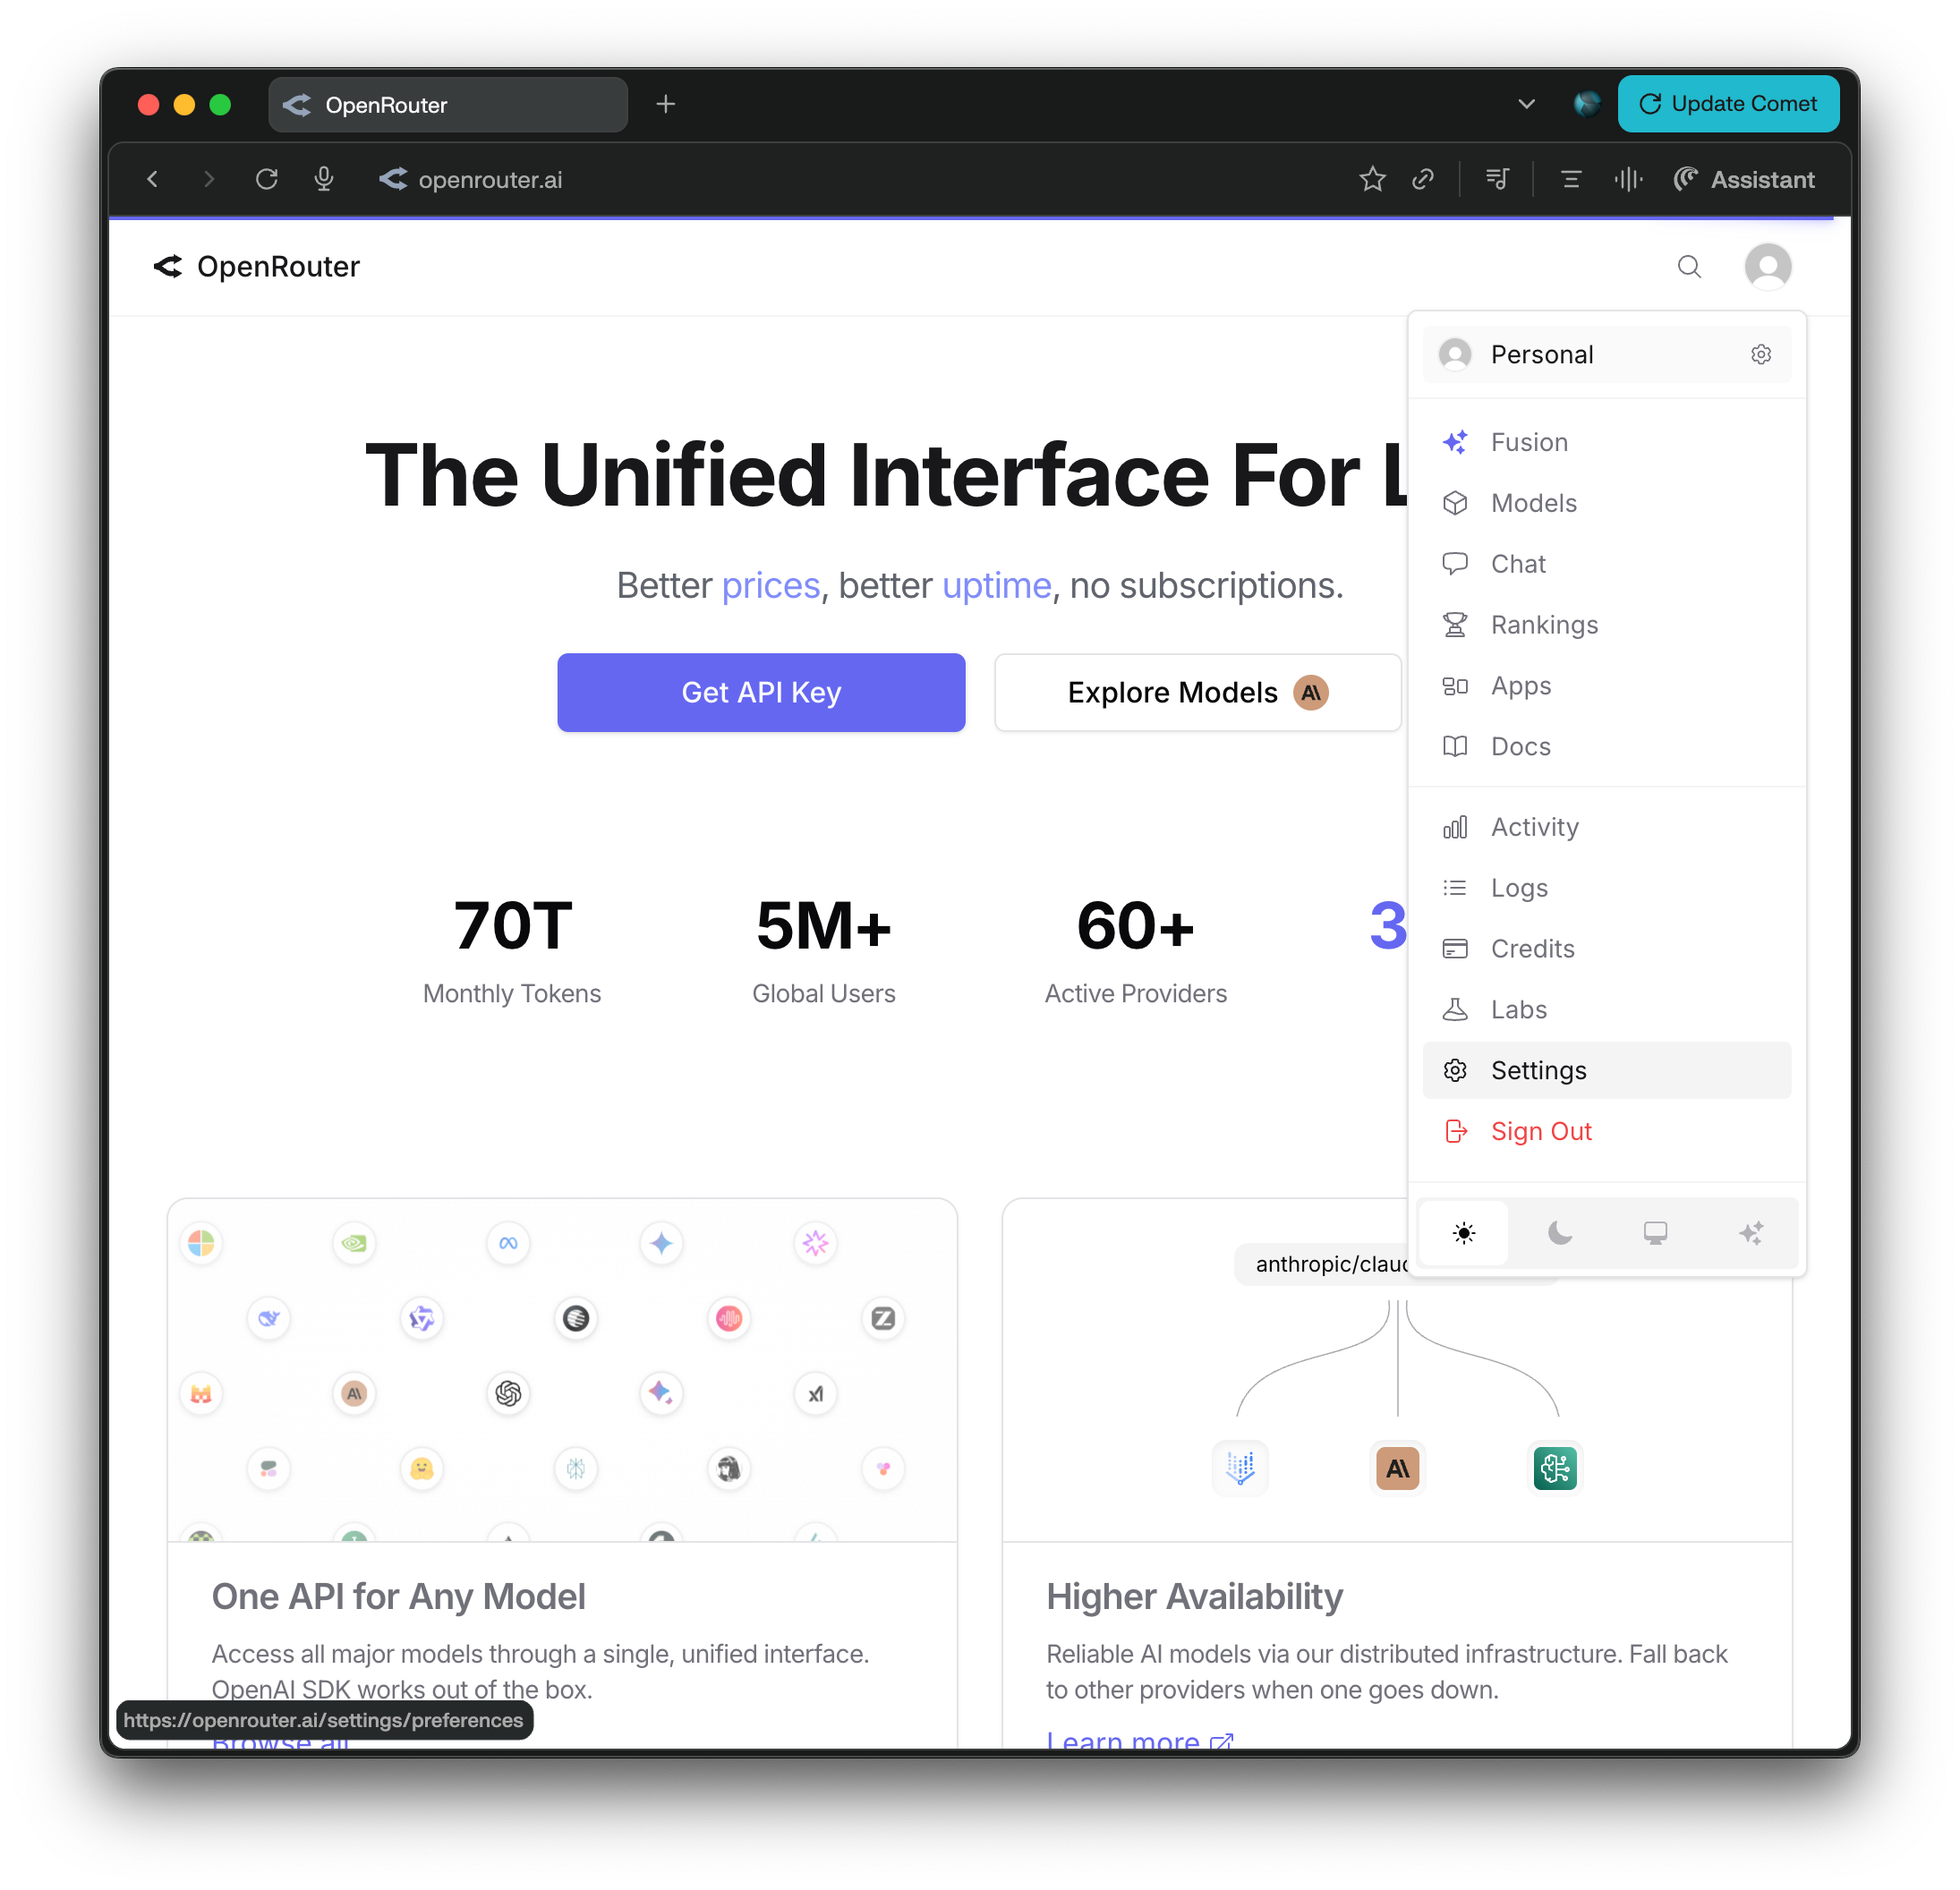
Click the settings icon to open your account settings. This is where you will configure your privacy preferences.
Step 3: Configure Guardrails
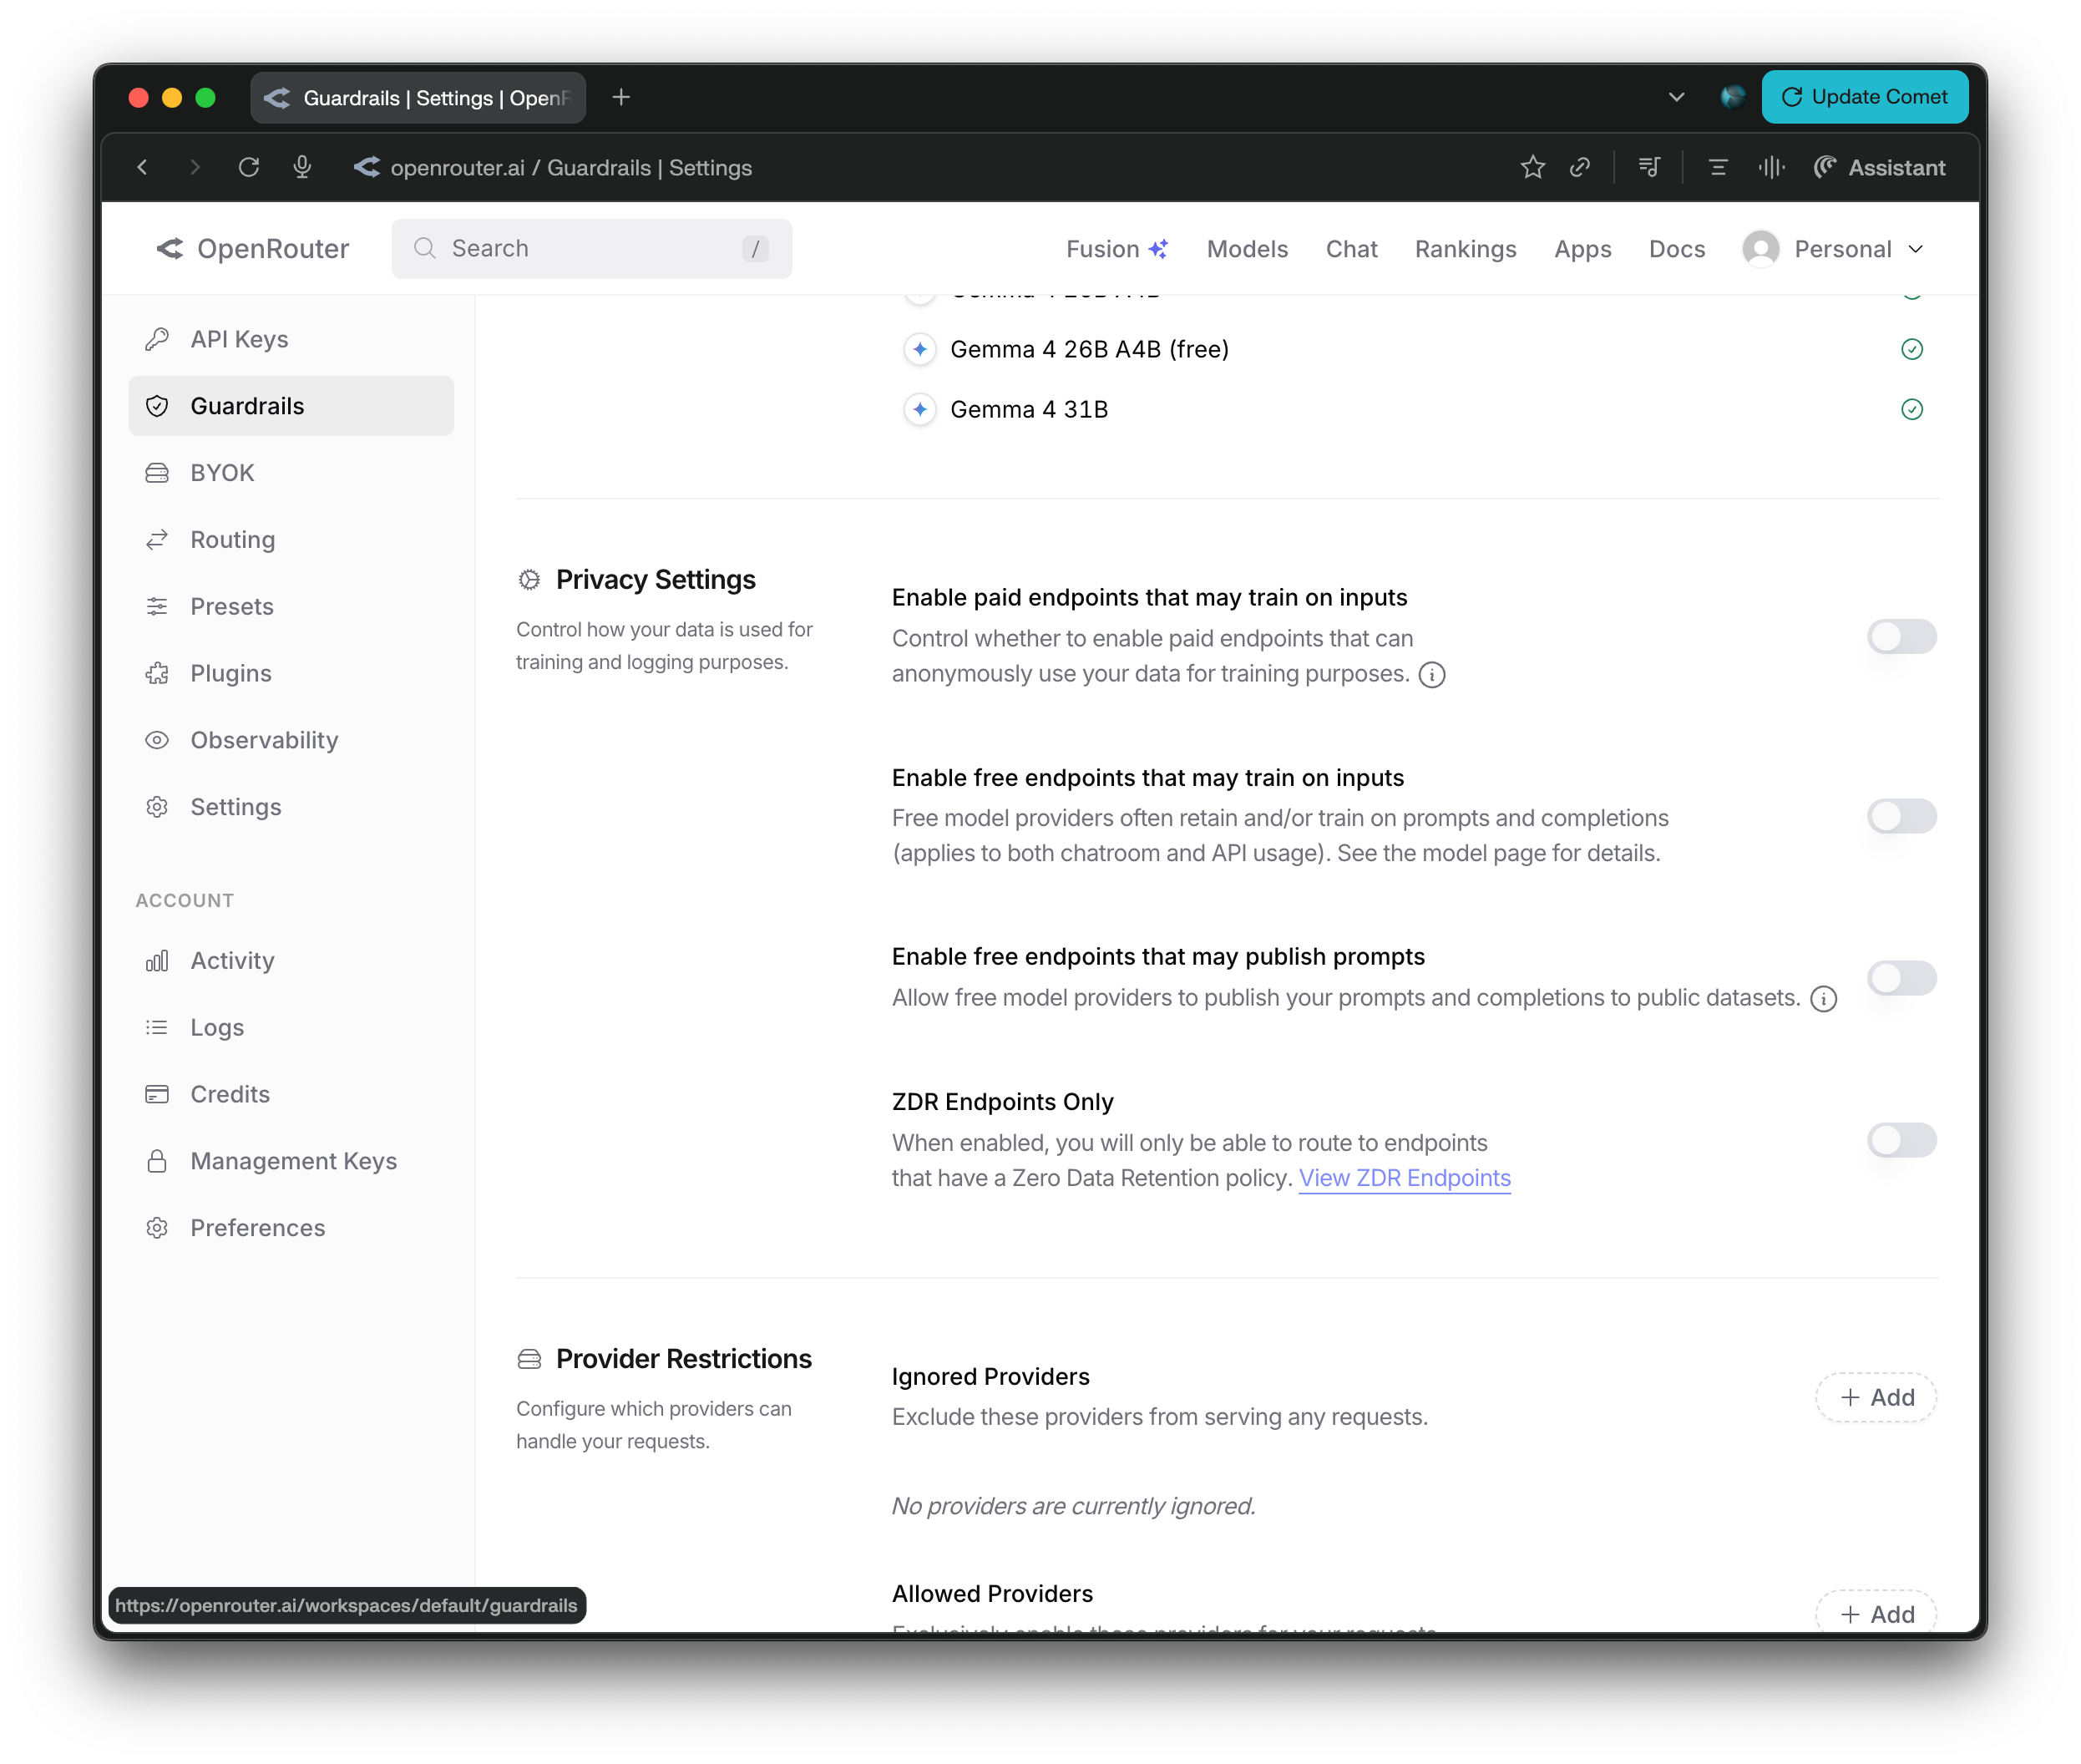
Navigate to Settings > Guardrails. Under Privacy Settings, you will see four toggles that control how your data is used for training and logging purposes:
- Enable paid endpoints that may train on inputs: Controls whether paid endpoints can anonymously use your data for training purposes. We recommend turning this off.
- Enable free endpoints that may train on inputs: Free model providers often retain and/or train on prompts and completions. We recommend turning this off.
- Enable free endpoints that may publish prompts: Allows free model providers to publish your prompts and completions to public datasets. We recommend turning this off.
- ZDR Endpoints Only: When enabled, you will only be able to route to endpoints that have a Zero Data Retention policy. We recommend turning this on for maximum privacy.
For the best privacy, disable the first three toggles and enable ZDR Endpoints Only.
Step 4: Add Credits
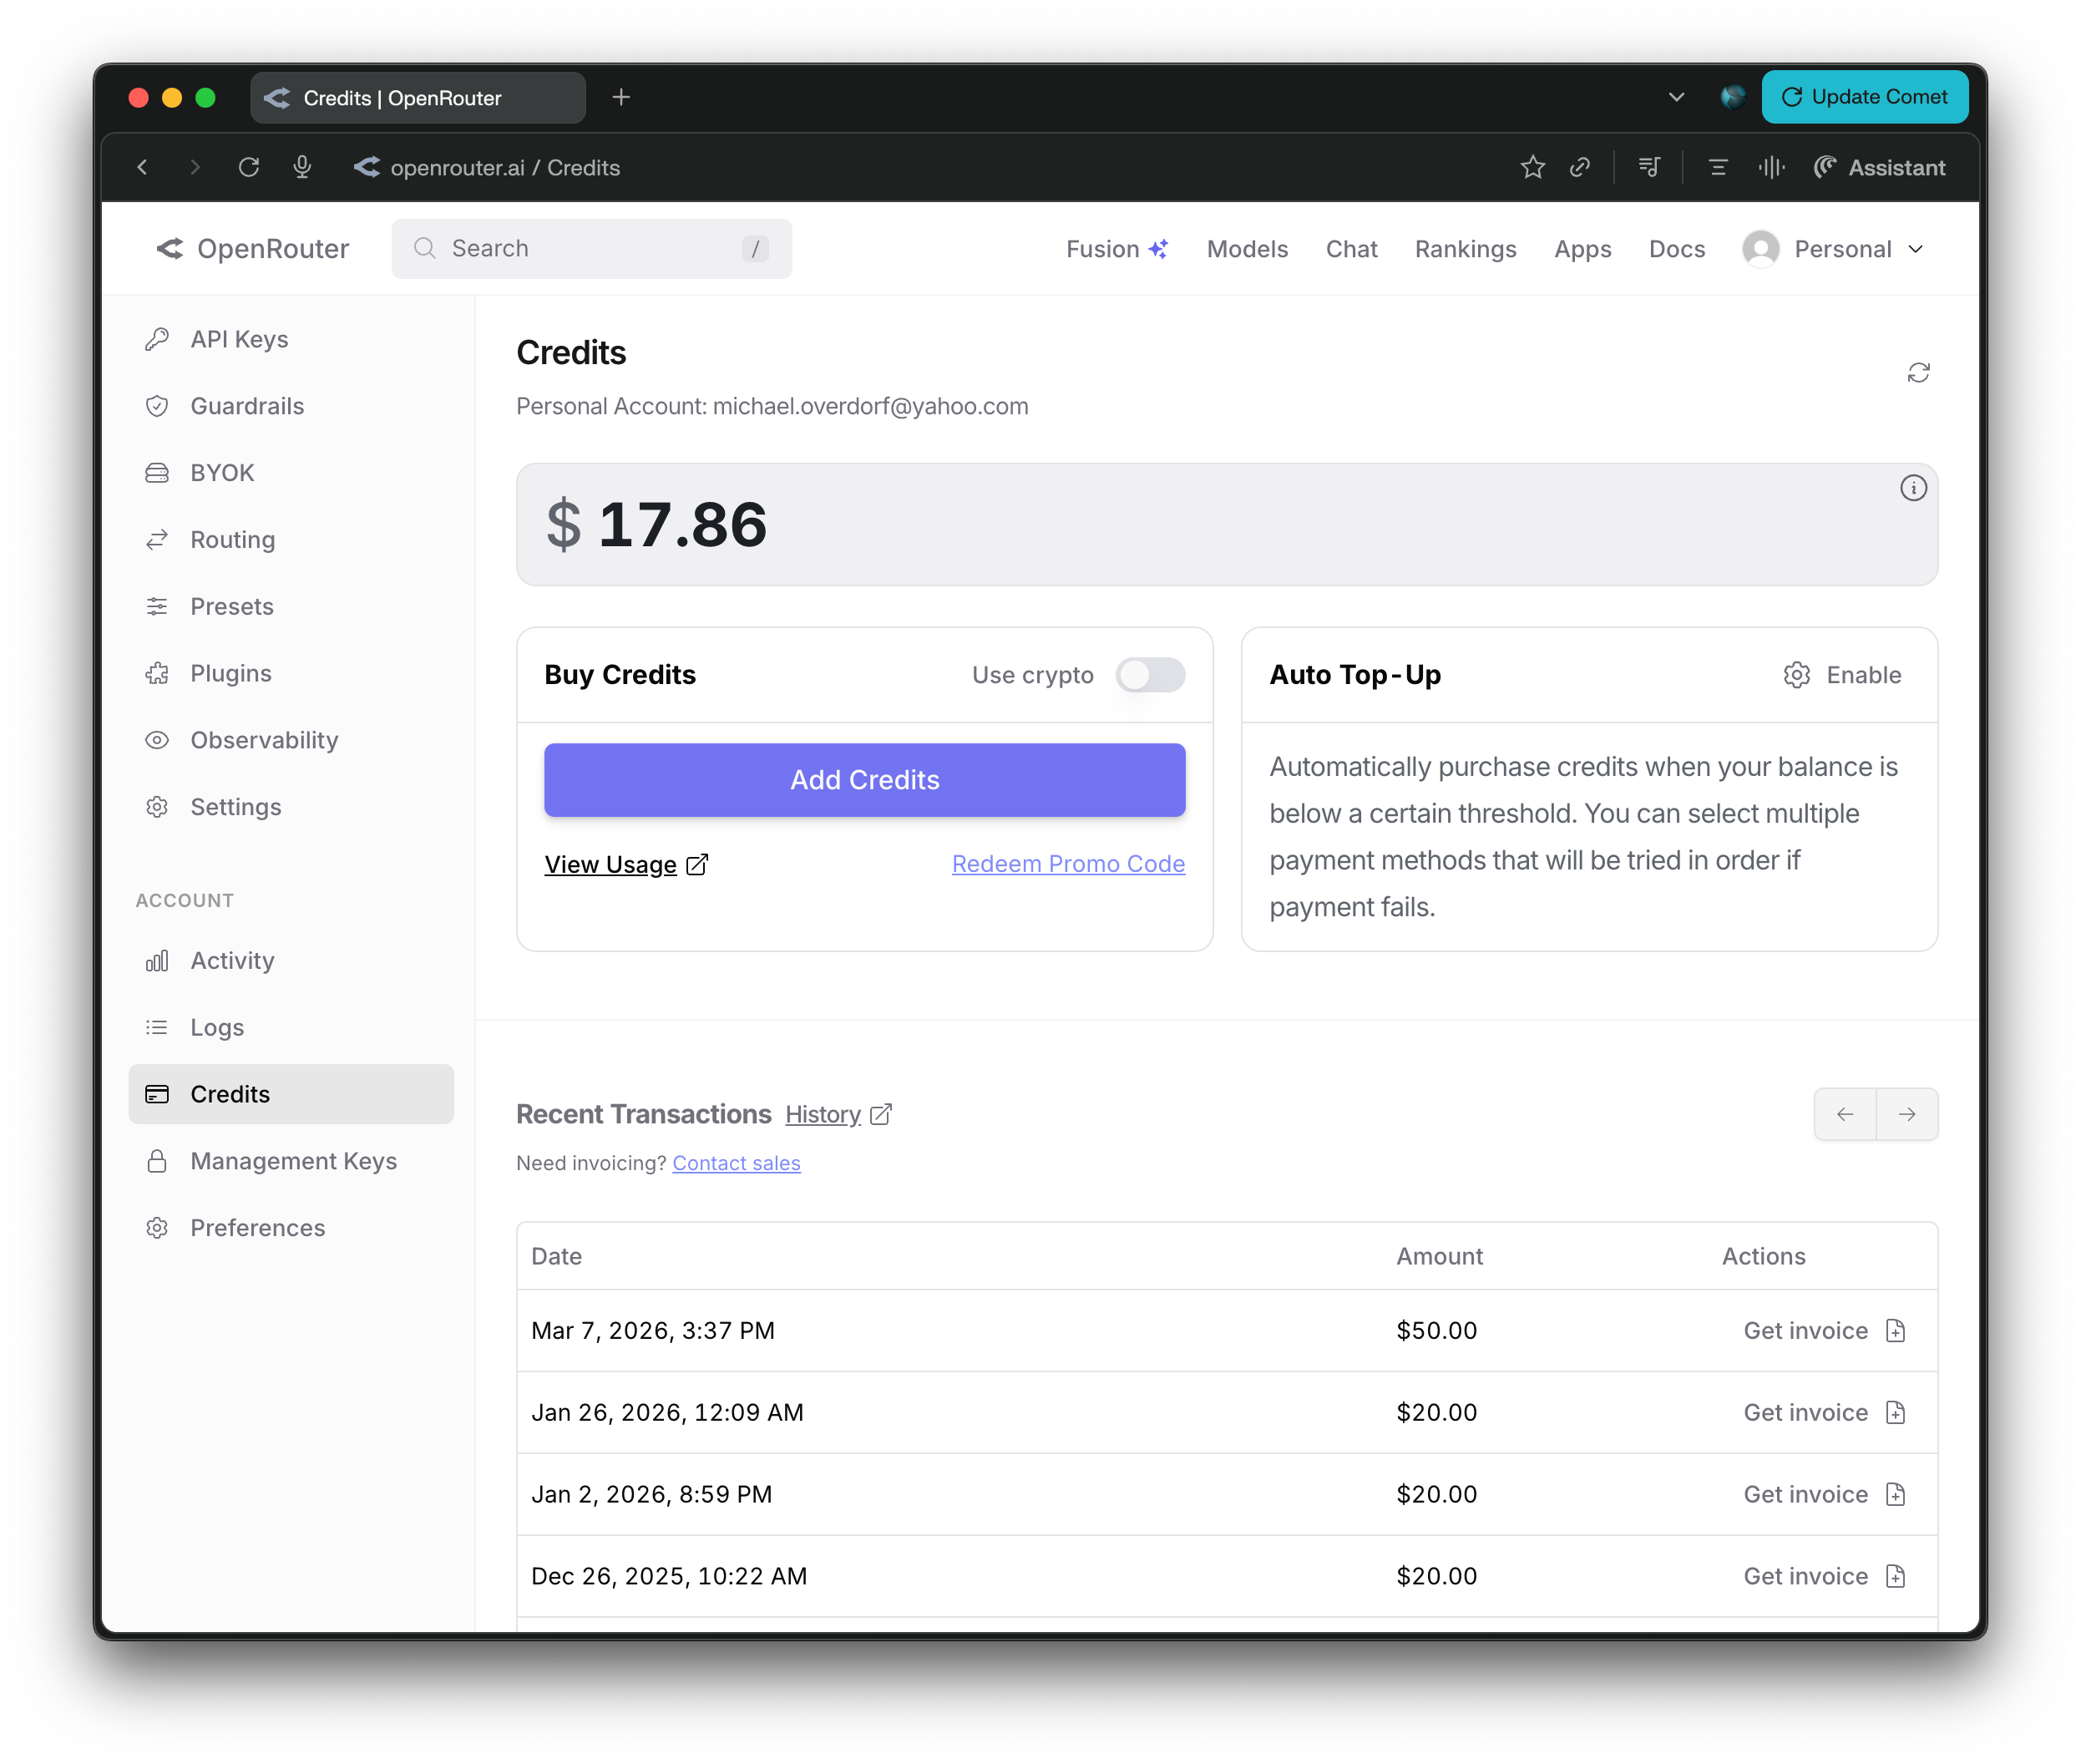
Navigate to the Credits section to add funds to your account. OpenRouter uses a pay-as-you-go model where you only pay for the tokens you use. A small amount like $5 or $10 is enough to get started and will last a while for typical usage.
Step 5: Navigate to API Keys
Go to the Keys section from the sidebar or account menu. This is where you will create the API key that VaultRAG needs to connect to OpenRouter.
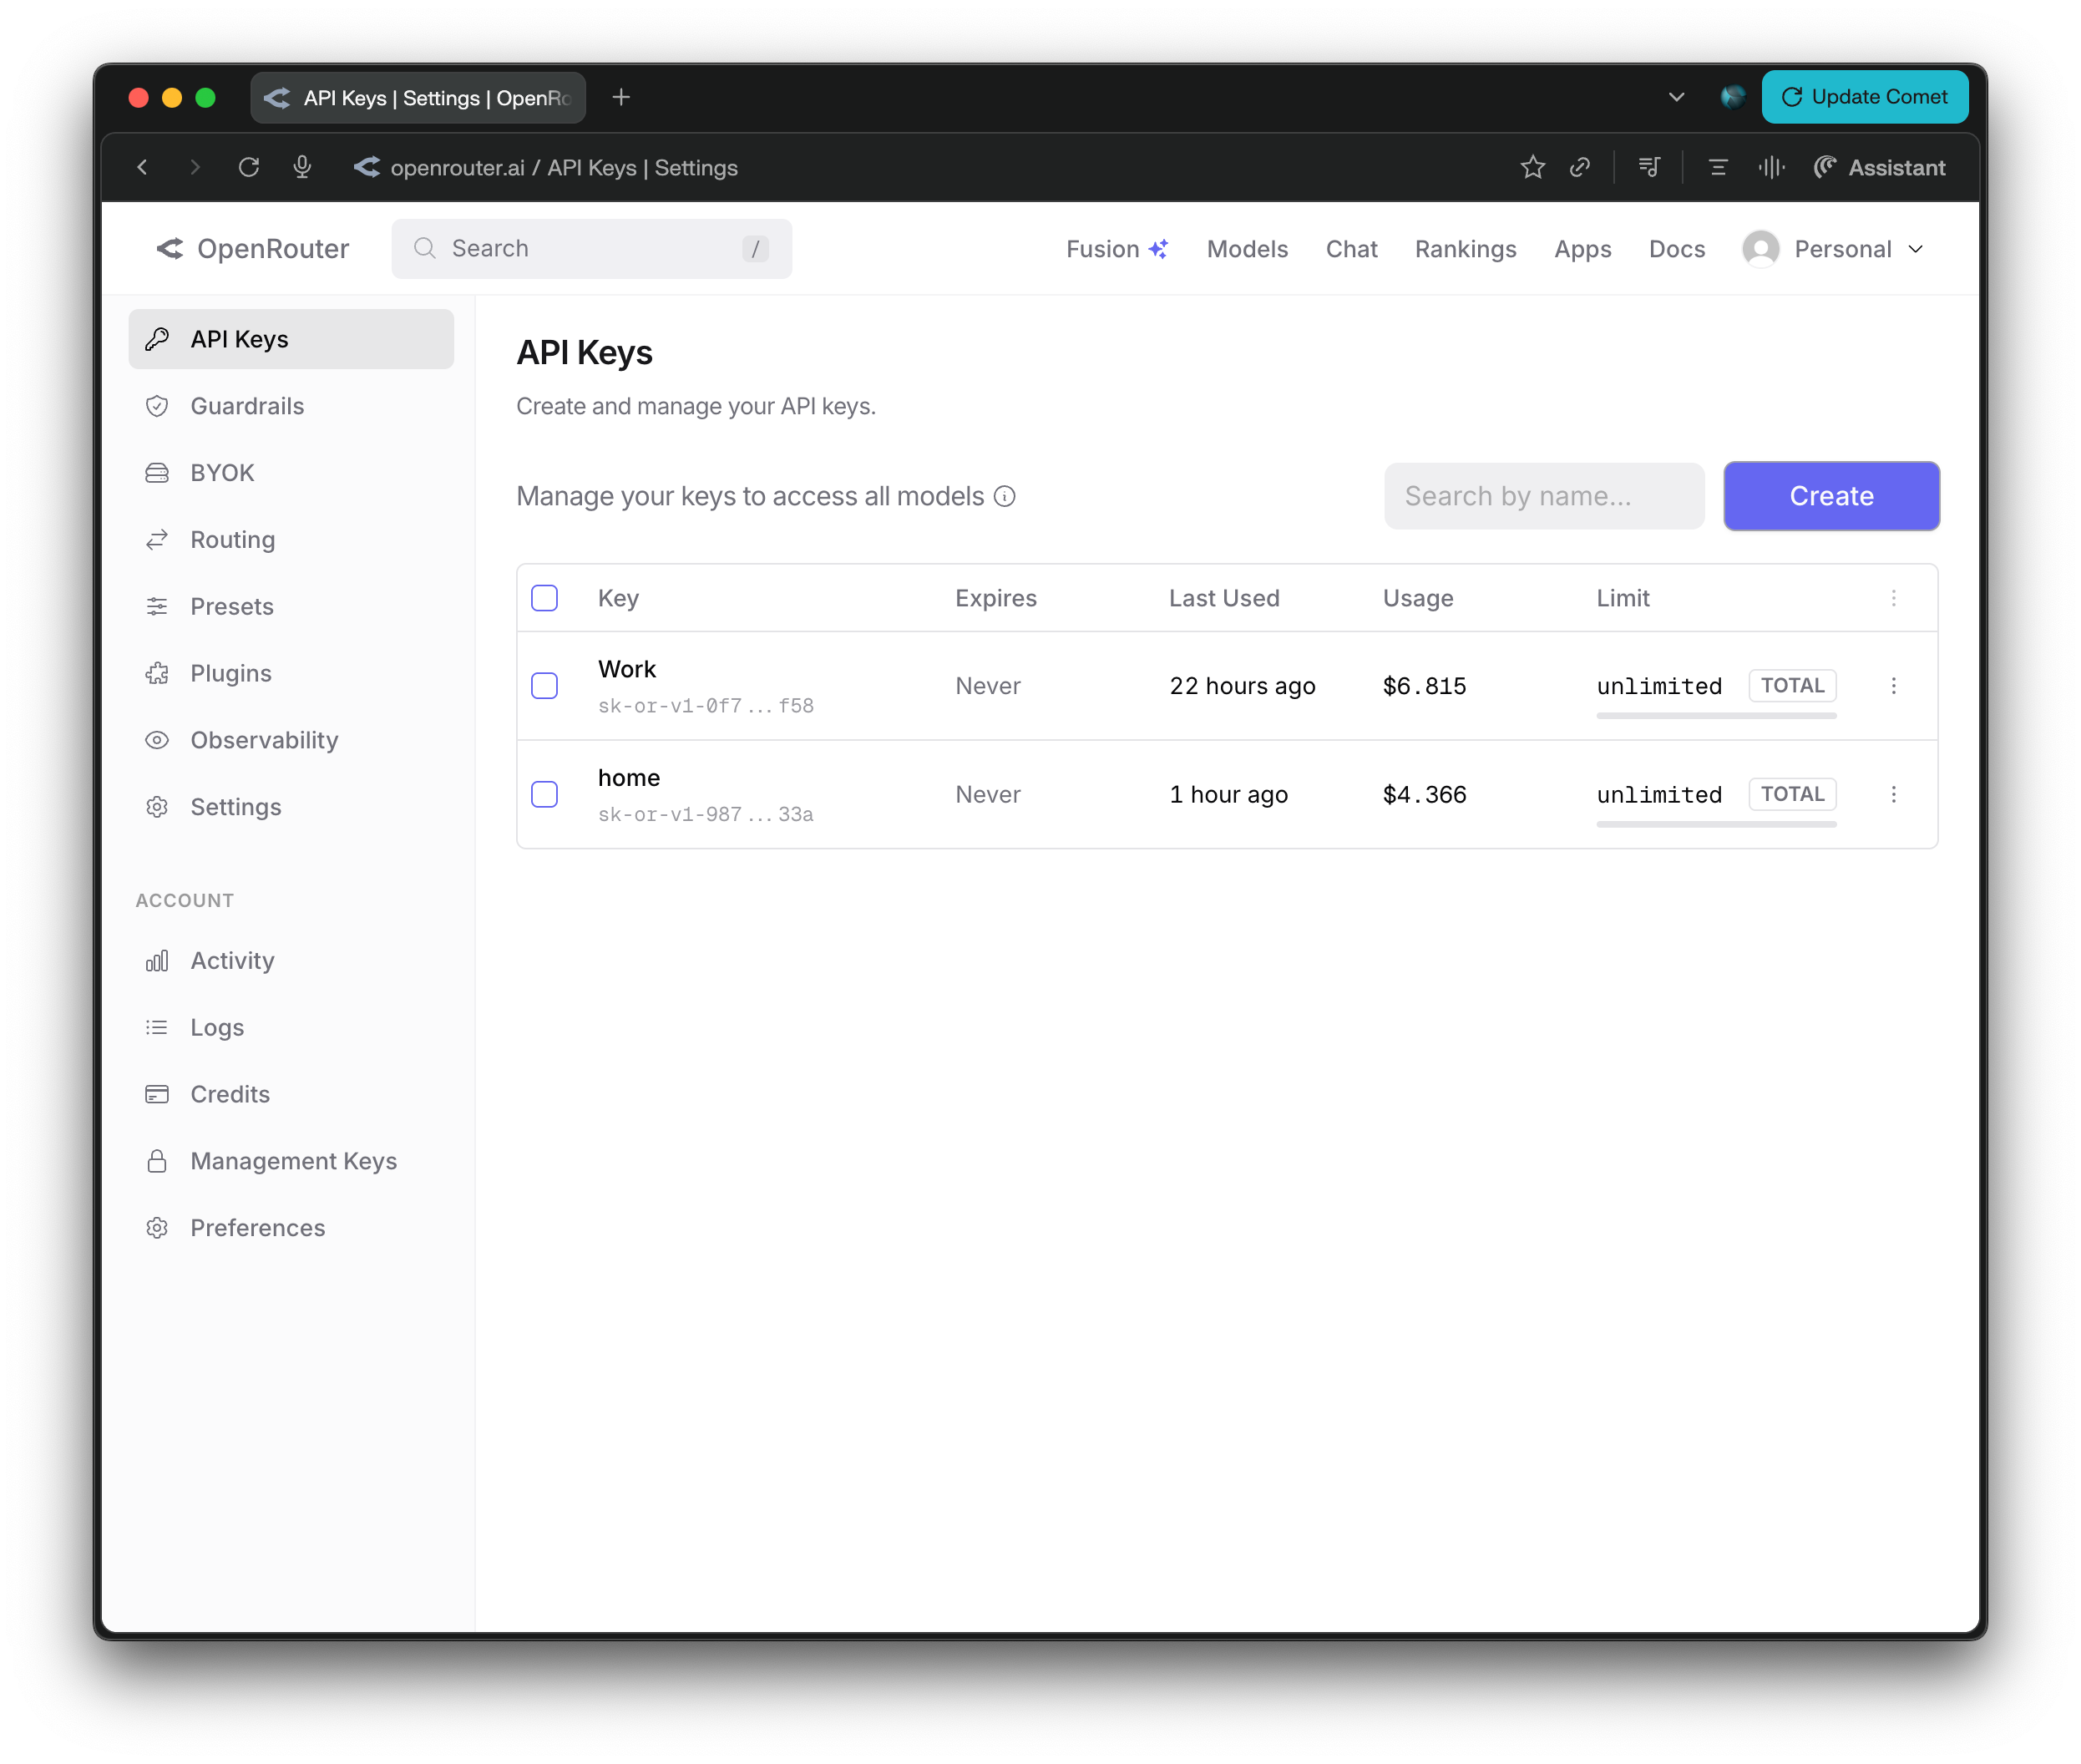
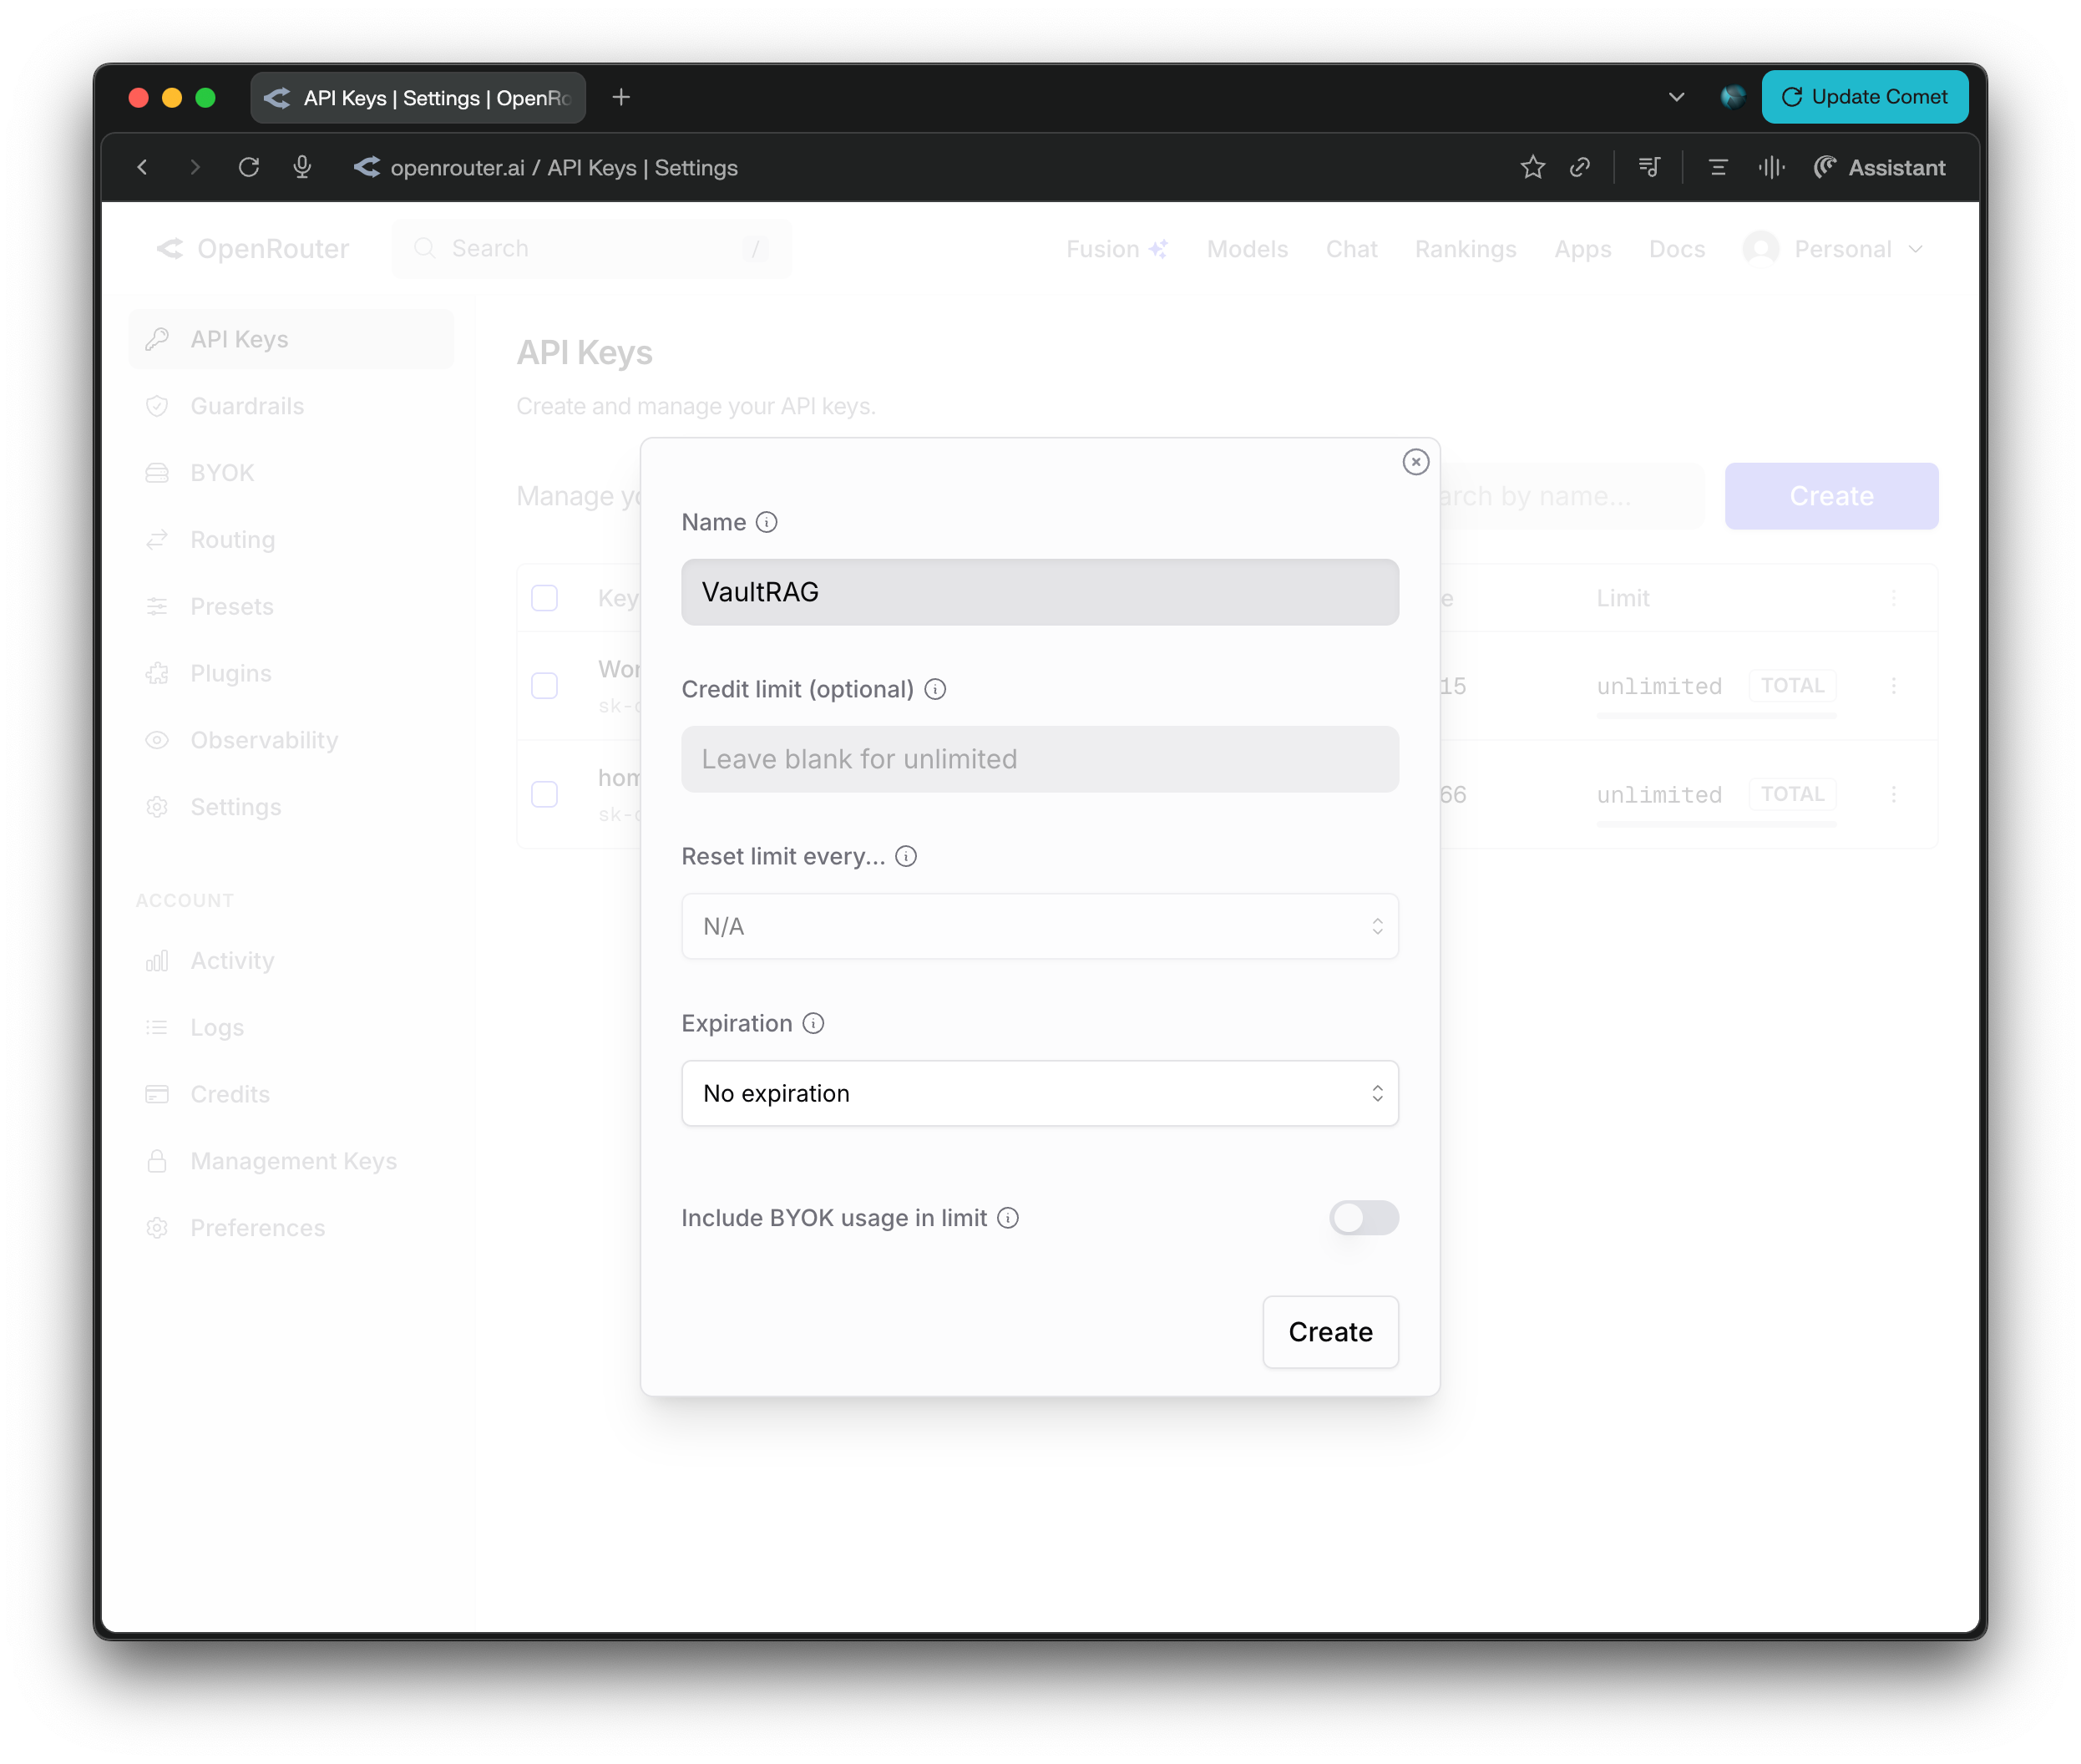
Step 6: Create an API Key
Click Create Key to generate a new API key. Give it a name like "VaultRAG" so you can identify it later.
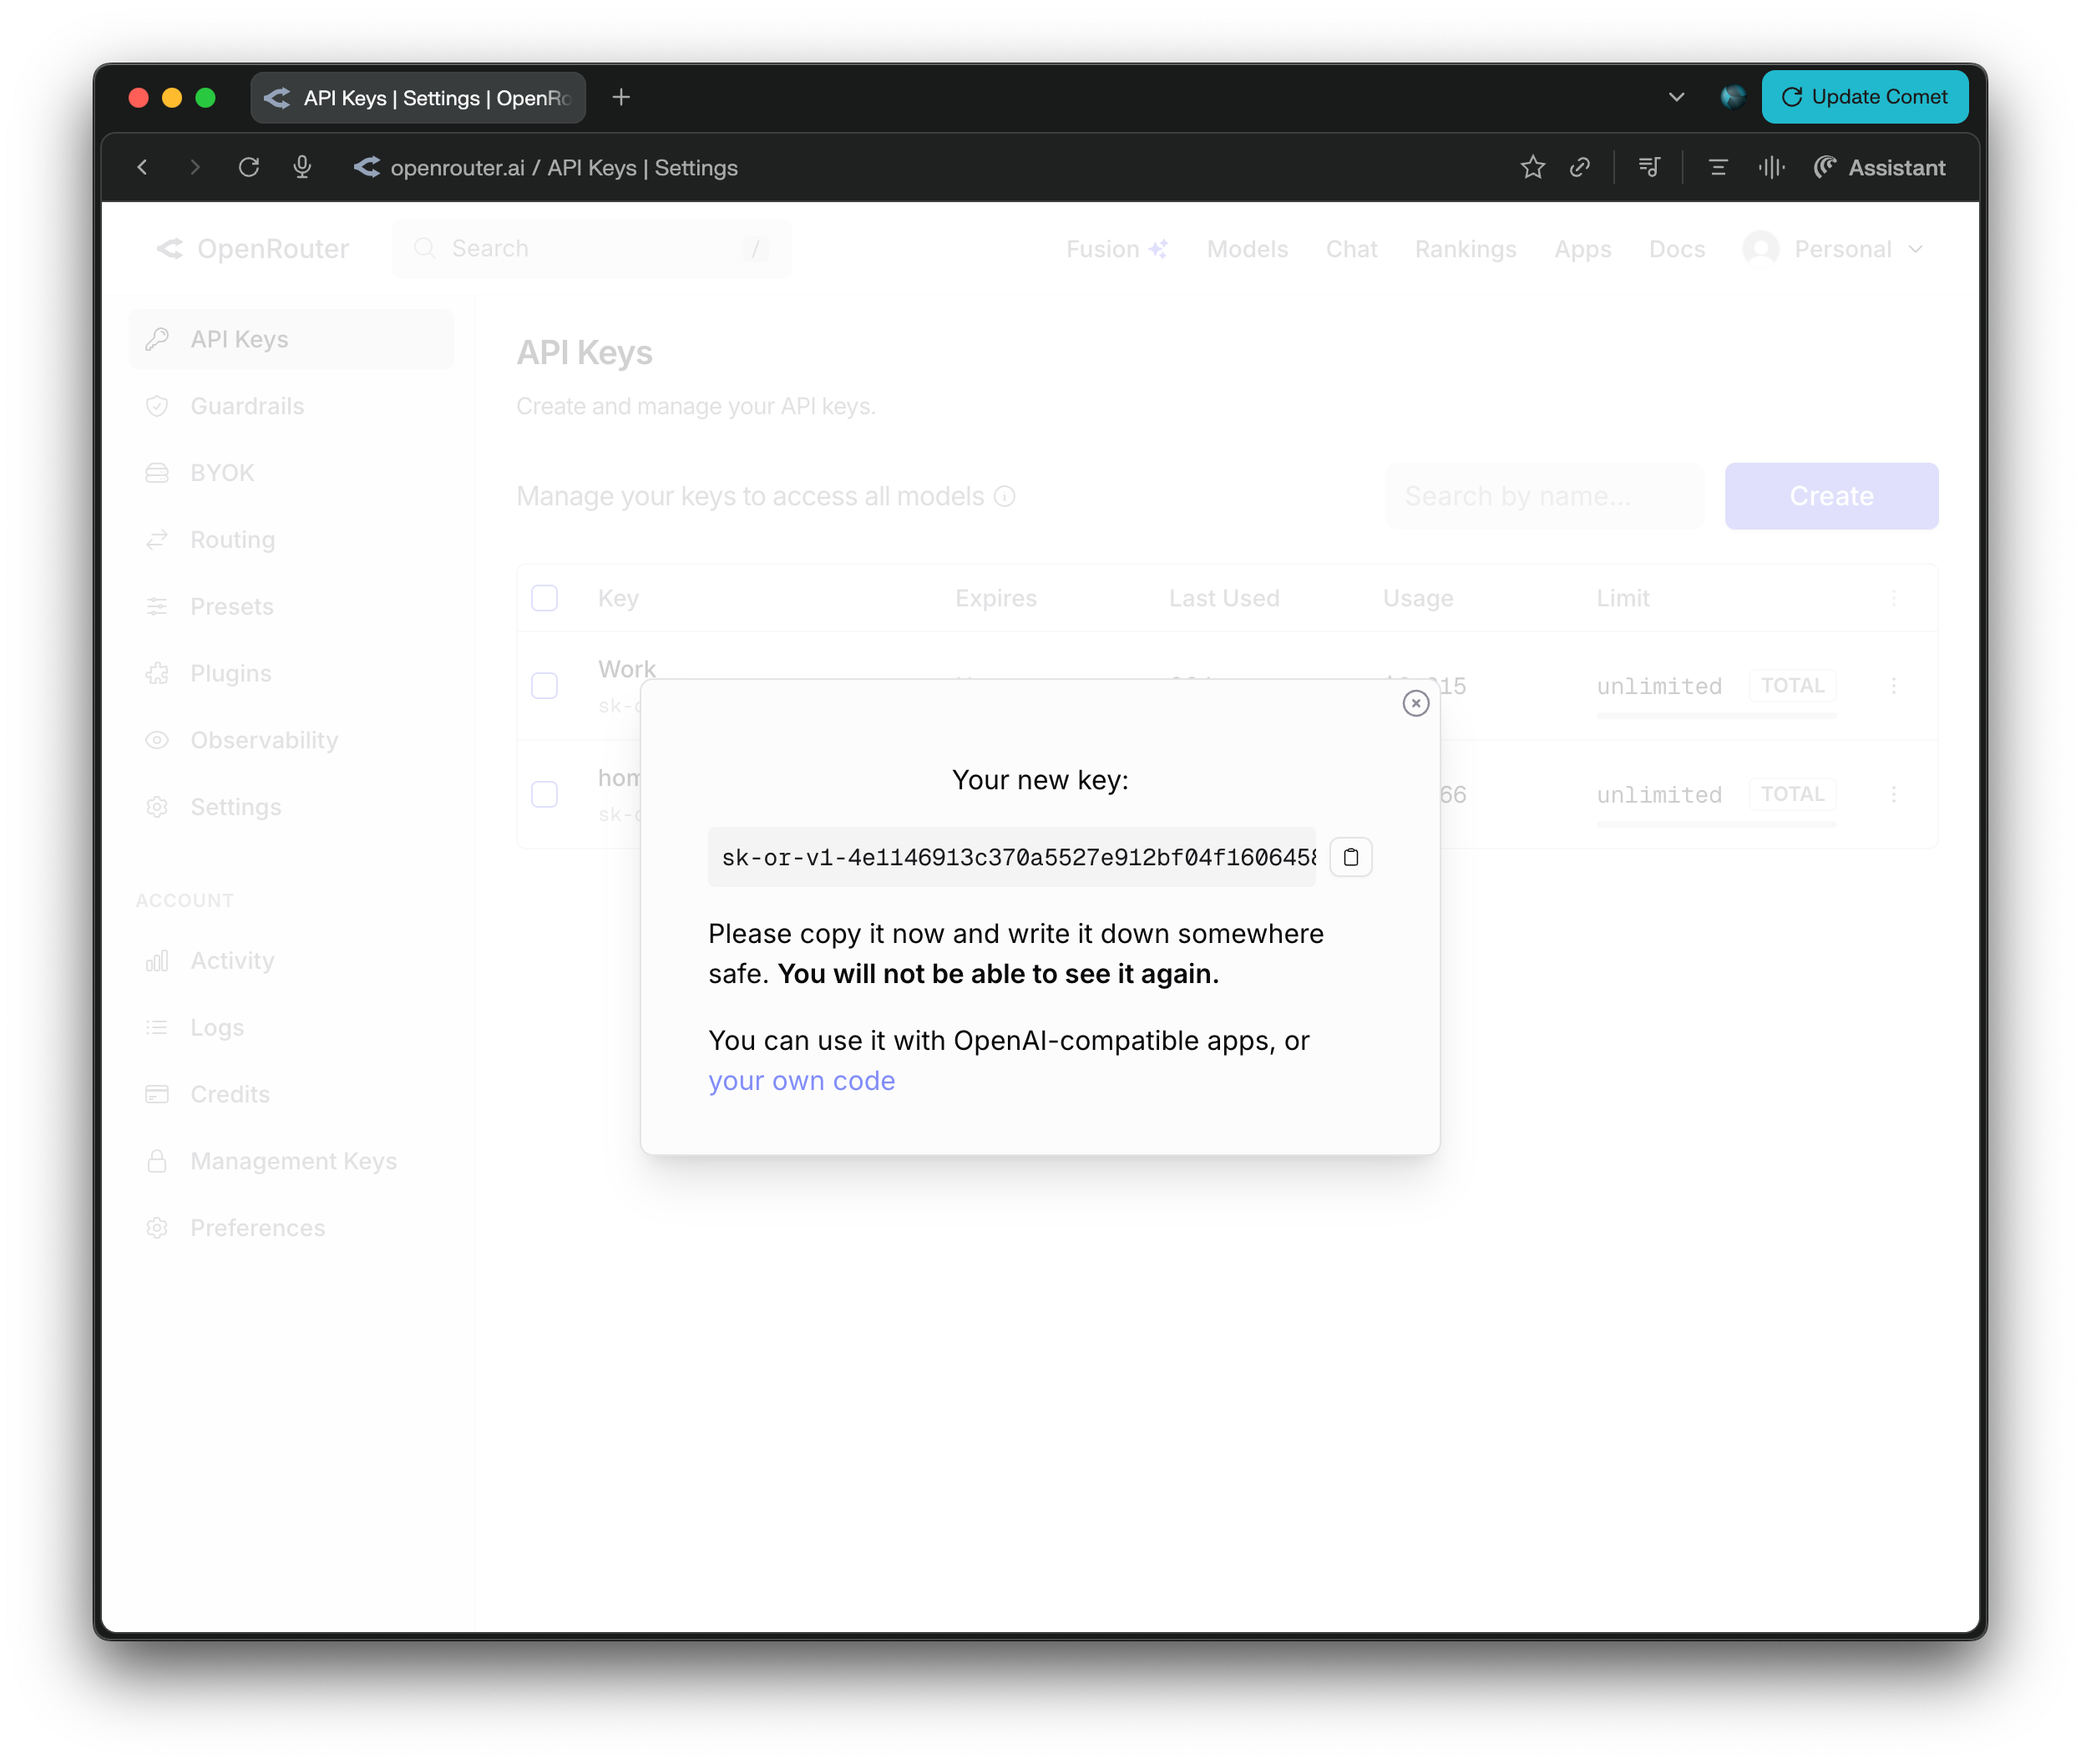
Step 7: Copy Your Key
Your new API key will be displayed. Copy it immediately as it will only be shown once. Keep it somewhere safe so you can paste it during the VaultRAG setup process.
Getting Started
VaultRAG is a desktop application for managing and querying your files using retrieval-augmented generation. Connect to leading AI models, index your documents, and get grounded answers with citations.
When you first launch VaultRAG, a setup wizard will walk you through the initial configuration. This guide explains each step.
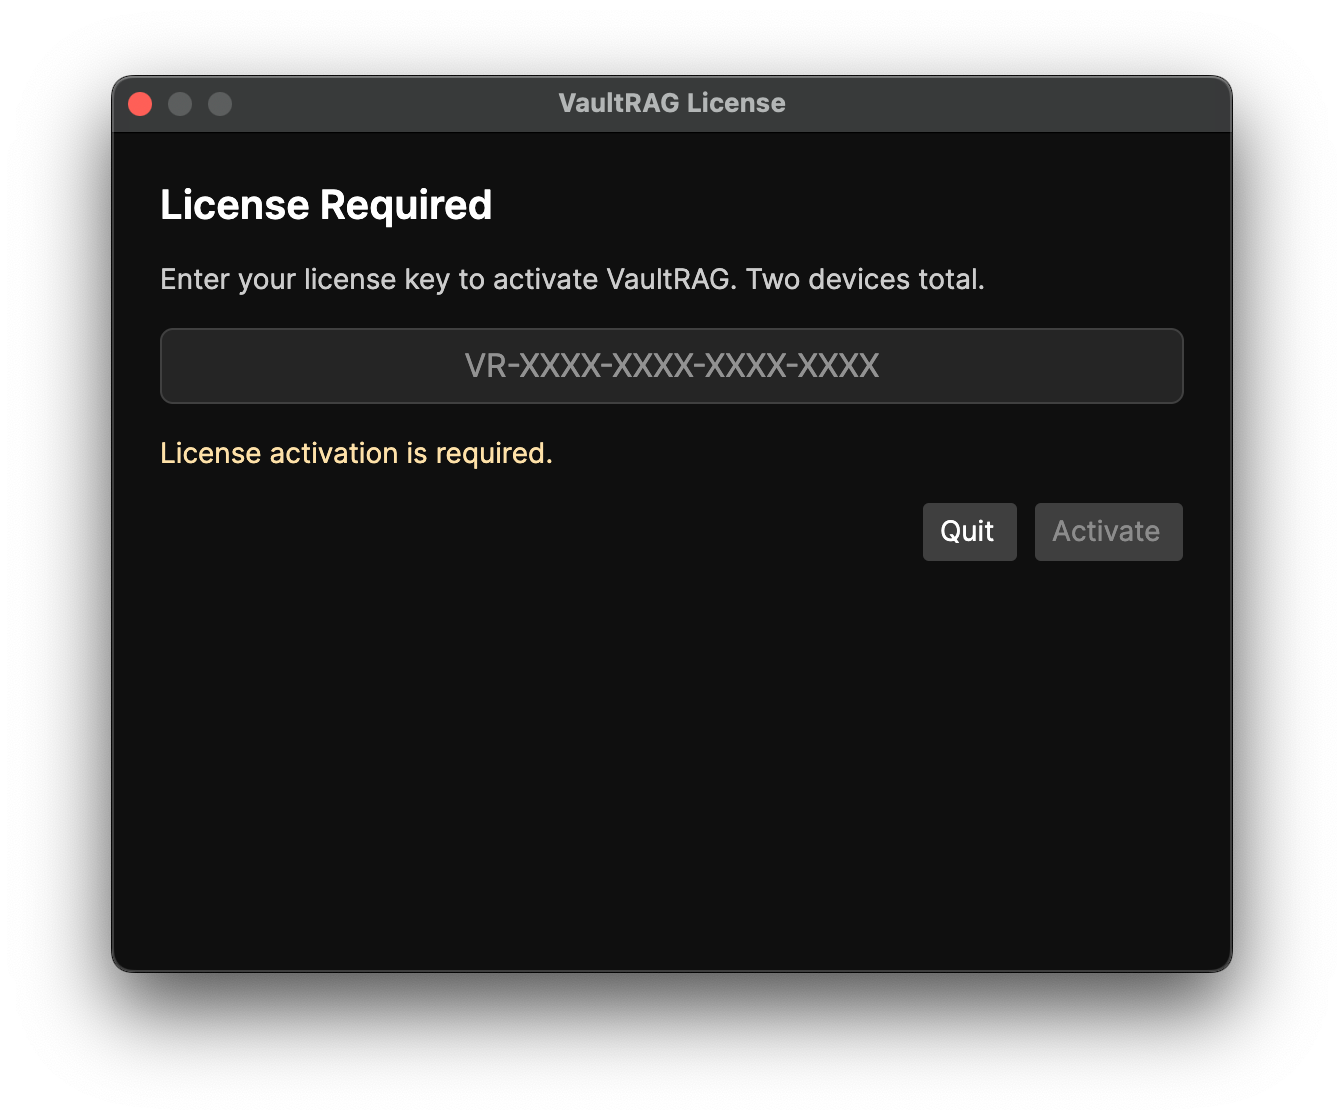
Step 1: License Activation
The first time you open VaultRAG, you will be prompted to enter your
license key. This is the key you received by email after your purchase,
in the format VR-XXXX-XXXX-XXXX-XXXX.
Paste your license key into the field and click Activate. Your license allows activation on up to two devices.
Step 2: Choose Your Vault Folder
Your vault folder is the directory that VaultRAG will monitor and index. Any files you place inside this folder will be read and processed by AI so you can search and ask questions about them.
We recommend creating a new, dedicated folder for your vault (for example,
Documents/VaultRAG). This is not strictly required — you can
point VaultRAG at an existing folder — but a dedicated folder gives you
clear control over what gets indexed.
Important: All files in your vault folder will be indexed and read by AI models. What that means for your privacy depends on the AI setup you choose in the next step:
- Cloud AI: the text of your documents is sent to your configured cloud provider to be processed. Do not place sensitive personal information (tax documents, passwords, medical records, etc.) in this folder unless you are comfortable with that data leaving your computer.
- Local AI: models run entirely on your own computer, so your documents are never sent anywhere — nothing leaves your machine. If you run local-only, it is much safer to index sensitive personal files.
If you are mixing both (Cloud + local), assume anything that can be handled by a cloud model may be sent to that provider, so treat your vault the same way you would for Cloud AI.
You can click Browse... to select a folder, or type a path directly. This can be changed later in Settings.
One-click local AI setup
This screen also includes a Set up local AI for me button. If you would rather not configure providers and models by hand, this option installs the chat and search models that fit your computer, enables GPU acceleration when available, and applies recommended settings in one step. You can skip it and walk through the next steps manually, and everything can still be changed later in Settings.

Step 3: Choose Your AI Setup
VaultRAG powers its chat, search, and indexing features with AI models, and you choose where those models run. There are three options:
- Cloud AI: Runs chat and embeddings on hosted models through OpenRouter. This is the best quality and the fastest to set up, but your prompts and the document text used to answer them are sent to the provider you choose. Cloud AI requires an OpenRouter API key.
- Local AI: Runs models entirely on this computer. Nothing leaves your machine, so it is the most private option, though quality and speed depend on your hardware. Local AI does not require an API key.
- Cloud + local: Uses cloud models for larger tasks and local models where they fit your computer, so you can balance quality against privacy.
Pick the option that fits your needs and click Next. You can change this later in Settings. If you choose Cloud AI (or Cloud + local), the next step lets you select your cloud models. If you choose Local AI (or Cloud + local), you will also walk through Local AI setup.

Step 4: Cloud Model Selection
If you chose Cloud AI or Cloud + local, this step connects you to OpenRouter and lets you pick your models. Paste your OpenRouter API key into the API key field — if you don't have one yet, see the OpenRouter Setup section of this guide. Click Test Connection to verify VaultRAG can reach OpenRouter, then Load Models to fetch the available models.
After loading models, you will see three model selection fields:
Chat model
This is the main model used when you ask questions about your documents.
Pick a model that balances quality and cost for your needs. We recommend
anthropic/claude-sonnet-4.6 for chat, but you can choose any
model available through your provider.
Note: only certain models can read images. If you need
the chat to parse screenshots, photos, or diagrams in your vault, use a
vision-capable model like anthropic/claude-sonnet-4.6 or
openai/gpt-5.5.
Embedding model
The embedding model converts text into vector representations
used for search and retrieval. This runs when your files are indexed and
when you ask a question. We recommend
perplexity/pplx-embed-v1-0.6b.
Text to embed
The Text to embed option controls what actually gets turned into vectors when your files are indexed. There are two modes:
- AI summary: VaultRAG first uses the summary generation model to write a short summary of each document, then embeds that summary. This gives the best search quality, but it requires a summary/chat model.
- Document text: VaultRAG embeds the document text directly, without generating a summary first. This is faster — especially with local models — and does not use the summary generation model.
Summary generation model
This optional model writes the per-document summaries used by the
AI summary embedding mode. We recommend
inception/mercury-2. Because it runs across your whole vault during
indexing, search OpenRouter for models with high throughput (TPS)
to keep indexing fast. If you use the Document text mode instead,
this model is not needed.
All model selections can be changed later in Settings.

Step 5: Local AI Setup
If you chose Local AI or Cloud + local, this step sets up models that run entirely on your computer. It has two parts: starting the local runtime and choosing your models, and installing the models that fit your hardware.
Runtime and model selection
VaultRAG runs a small local runtime that hosts your models on this computer. Use Start LocalAI to launch it and Refresh to update its status; when it is ready, the screen shows that the runtime is running.
The Minutes idle before unloading field controls how long loaded
models stay in memory after you stop using them. Set it to 0 to keep
your selected local models loaded until you stop the runtime or unload them
manually. Loading models keeps later queries fast; if they are not loaded, the
first local query may be slower while the model session opens.
Under Selected local models, choose a Chat model, an Embedding model, and an optional Summary model. These can all be changed later in Settings.

Installing local models
Below the selectors, the Install local models list shows the models you can download to this computer. Each entry lists its size, a short description, and what it can be used for (for example, embedding, main chat, summary, tools, or reasoning).
Pay attention to each model's memory requirement. Models that need more RAM than your computer has are marked Blocked and cannot be installed, so pick models that fit the amount of memory your machine reports.

Step 6: Global Hotkey
VaultRAG can be opened from anywhere on your computer using a global keyboard
shortcut. The default is Cmd+Shift+Space on Mac. Click the field
and press your preferred key combination to change it.
This lets you quickly pull up VaultRAG to ask a question without switching windows or finding the app in your dock.
Window control buttons
This screen also has a Show window control buttons option. These are the close, hide, and fullscreen buttons in the title bar. VaultRAG hides them by default for a cleaner, command-palette style window — with them off, use the global hotkey to hide or show VaultRAG. You can turn the buttons back on later in Settings > General.
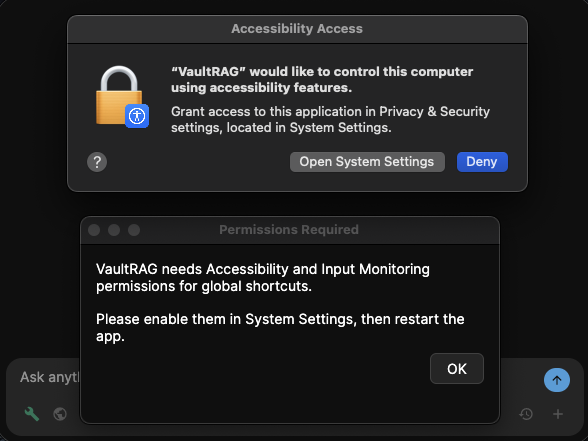
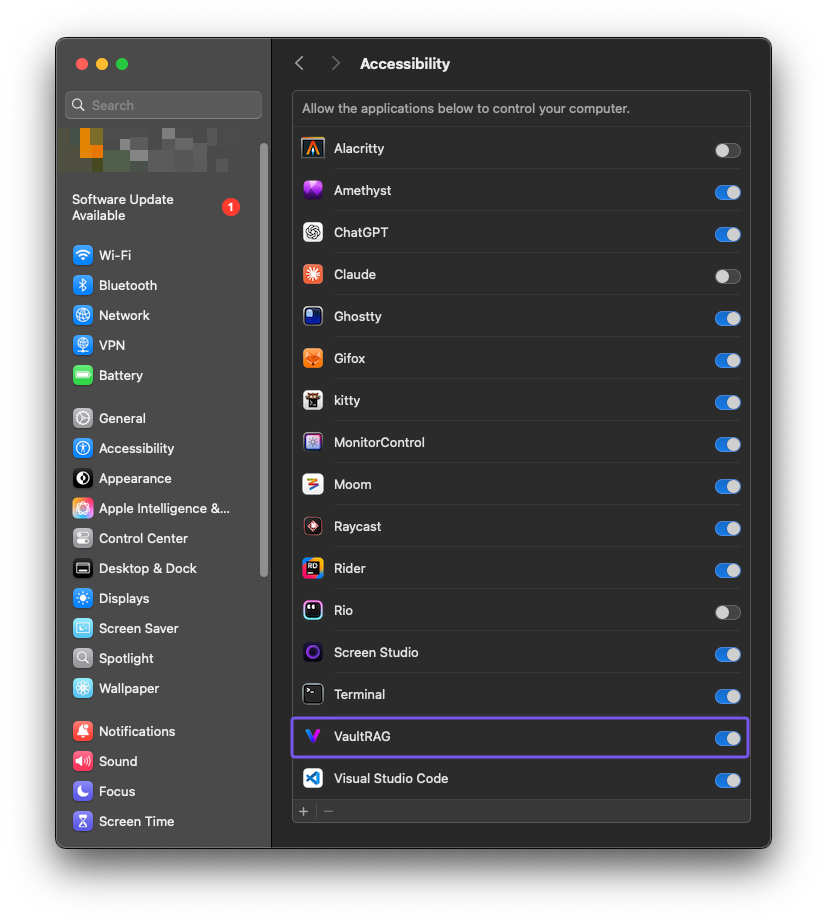
macOS permissions
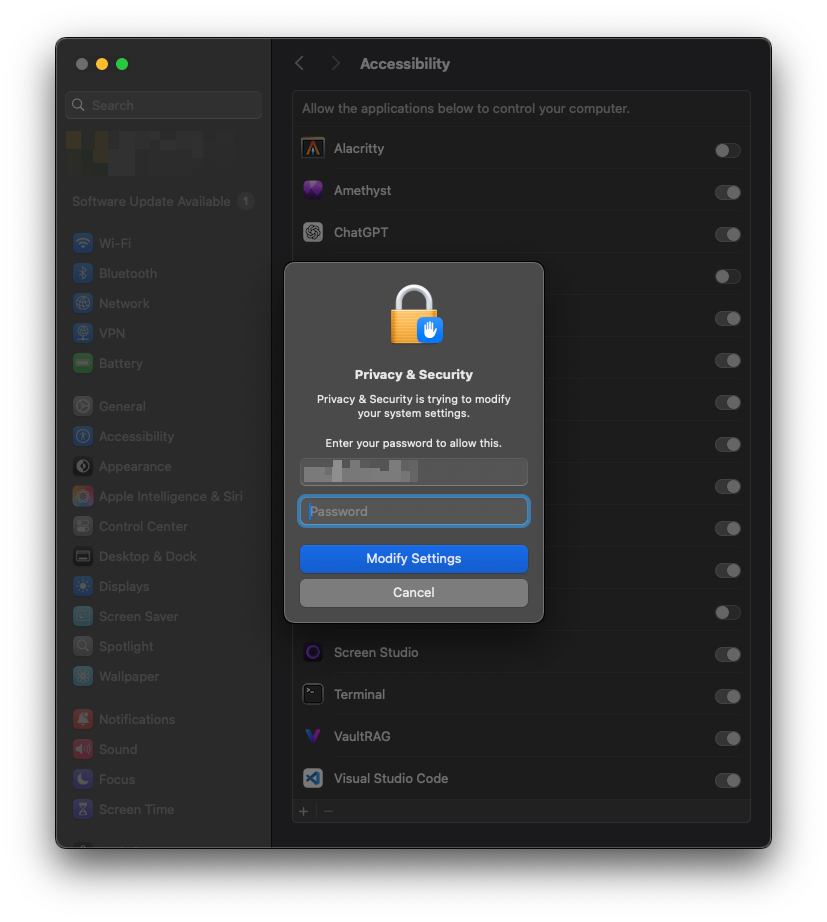
On macOS, global hotkeys require Accessibility permissions. If the hotkey does not work after setup, go to System Settings > Privacy & Security > Accessibility and make sure VaultRAG is listed and enabled. You may need to click the lock icon and add VaultRAG manually if it does not appear.
Troubleshooting
If you previously installed VaultRAG, you may need to remove it from the Accessibility list and add it again. Open System Settings > Privacy & Security > Accessibility, select VaultRAG, click the minus button to remove it, then click the plus button to add it back. You must restart VaultRAG after making these changes for them to take effect.

Step 7: Web Search (Optional)
VaultRAG can optionally search the web during chat to supplement your vault documents with live web results. When enabled, you can toggle web search on or off in the chat interface.
Whether you need a key here depends on your AI setup:
- OpenRouter (Cloud AI): web search works out of the box using OpenRouter's built-in search. A Tavily key is optional and lets you pick Tavily as an alternative search provider.
- Local AI: a Tavily key is required for web search, since local providers don't include a search backend.
This step is entirely optional. If you do not need web search, leave the field blank and click Next. You can always add a Tavily key later in Settings.
Getting a Tavily API Key
To enable web search, you need a free API key from Tavily. Follow these steps:
1. Visit Tavily
Go to tavily.com. Tavily is a search API designed specifically for AI applications, providing clean, structured results optimized for LLM consumption.
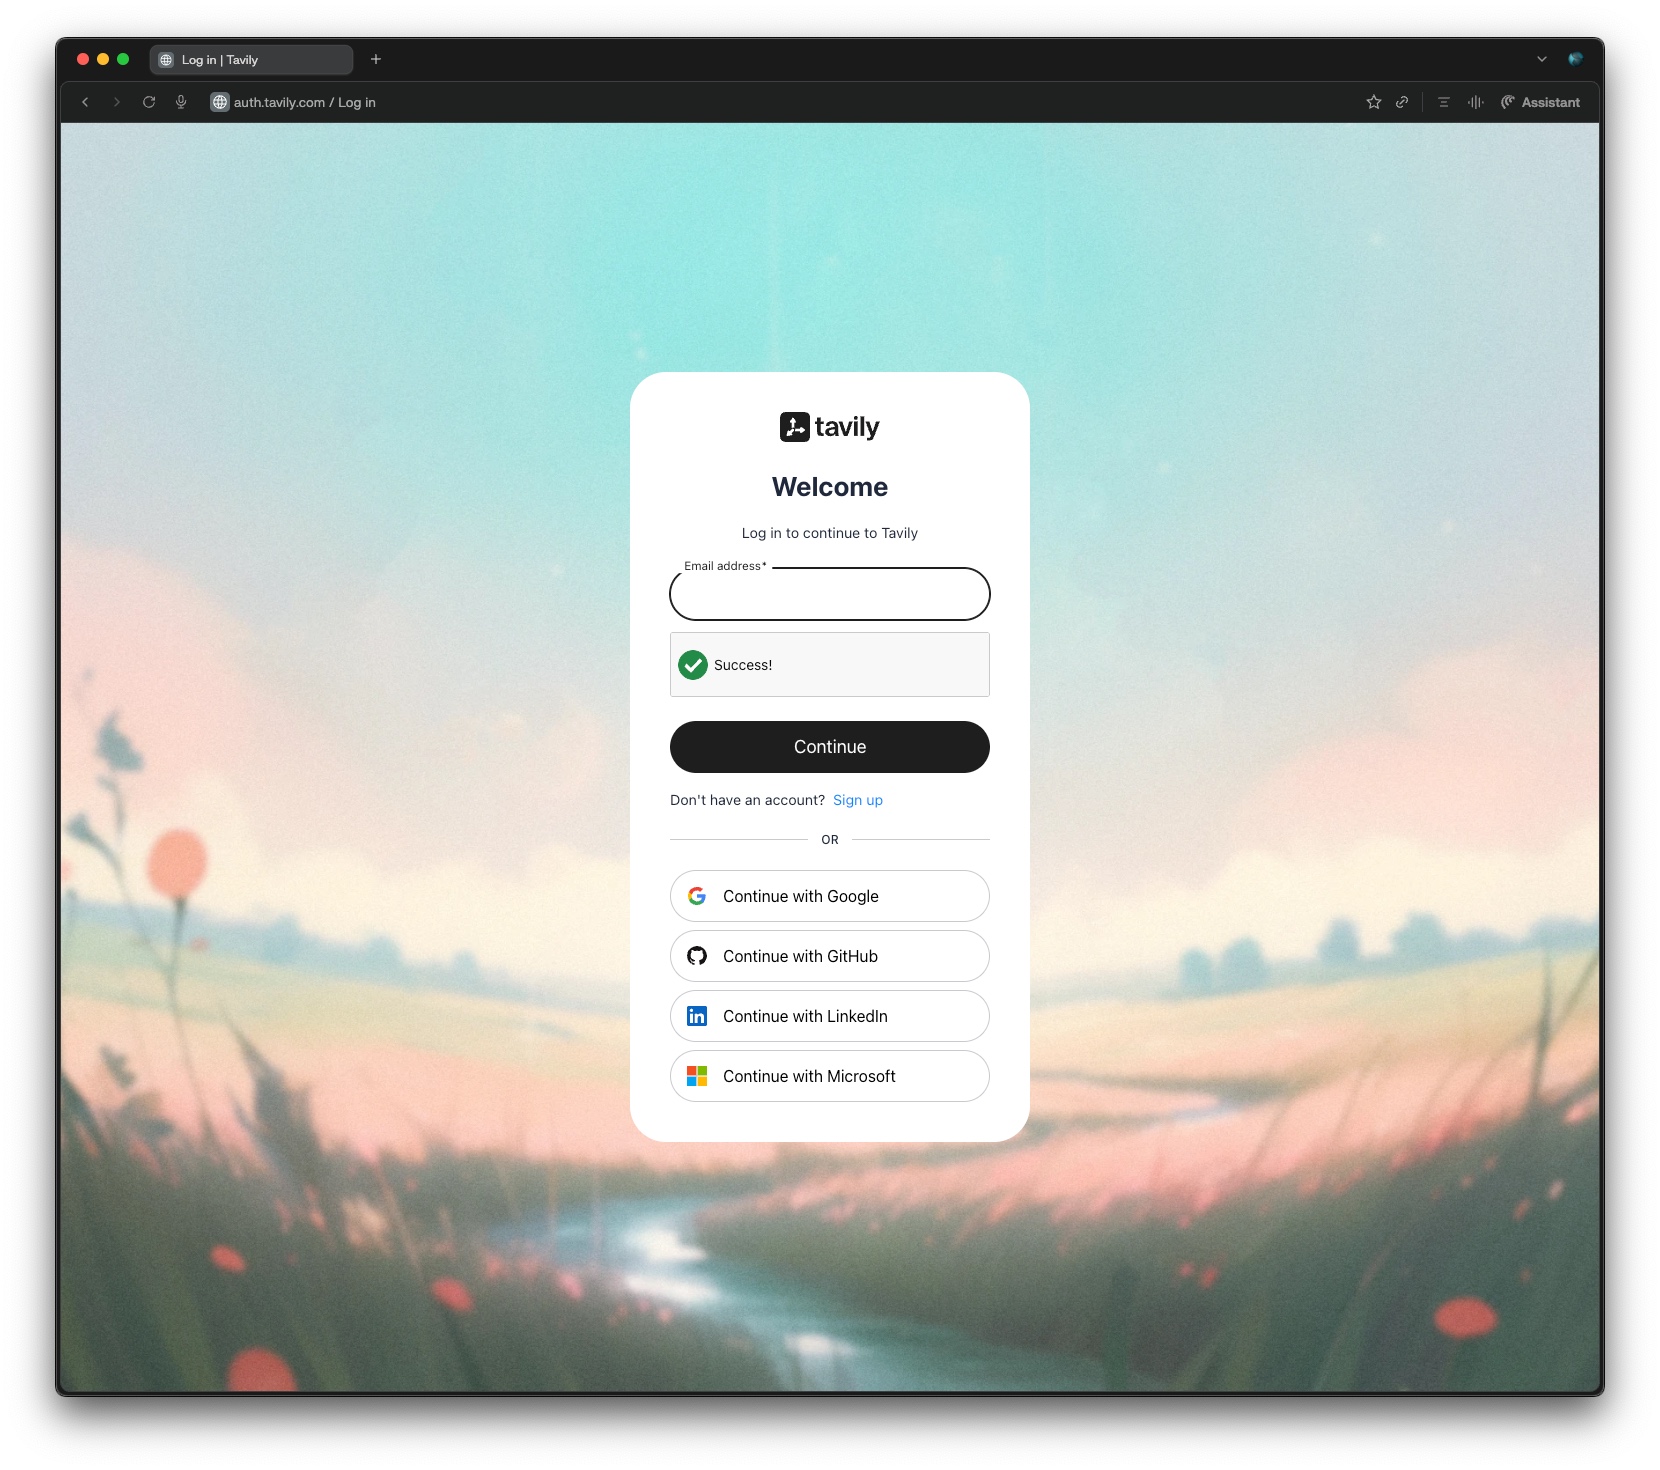
2. Create an Account
Click the small Sign Up link underneath the Continue button to create a free account.
3. Create an API Key
After signing in, you will be taken to the Tavily dashboard. Click the + button to the right of API Keys to create a new API key. The free tier includes 1,000 API calls per month, which is more than enough for typical use.

4. Name Your API Key
Give your API key a name. Any name is fine.

5. Copy Your API Key
Click the copy button next to your API key to copy it to your clipboard.

Once you have your API key, paste it into the Tavily field in VaultRAG and you are all set. You can test the connection in Settings > AI at any time.

Step 8: Finishing Up
The final step confirms that setup is complete and gives you a few tips to get started:
- Type
helpin the main window to see available commands and shortcuts. - Use the Settings menu to update your providers, API keys, models, and vault location at any time.
- Only files inside your vault folder are indexed for search.
Click Finish to close the setup wizard and start using VaultRAG. All of these settings can be changed later from the Settings menu inside the app.

Enable macOS permissions for the launch shortcut
On macOS, VaultRAG asks for Accessibility and Input Monitoring permissions so the global launch shortcut can bring VaultRAG to the front from any app. Most in-app shortcuts work without these permissions, but the global launch shortcut needs them to listen for your key combination while another app is active.
When macOS shows the permission prompt, click Open System Settings. In Privacy & Security > Accessibility, turn on VaultRAG. macOS may ask for your password or Touch ID to confirm the change.
If the launch shortcut still does not bring VaultRAG to the front, also open Privacy & Security > Input Monitoring and enable VaultRAG there as well, then restart the app.
Once setup is complete, you can navigate VaultRAG using simple text commands.
Type help in the chat to show the help guide with all available
commands and keyboard shortcuts. Type vault to open the vault
browser, or press Tab to switch between Chat, Vault, and
Analytics views. Type analytics to view your usage statistics,
or type settings to open the settings panel.

Settings
The Settings panel lets you adjust VaultRAG's configuration at any time. Open it from the menu inside the app. Settings are organized across five tabs: General, AI, Indexing, Files, and About.
General
The General tab covers your vault location, appearance, global hotkey, database maintenance, and vault statistics.

Vault Path
The root folder that VaultRAG indexes and searches. Every file inside this folder (and all of its subfolders) becomes part of your vault and is made searchable by name, content, and AI-generated embeddings. Click Browse... to select a new directory or type a path directly. When you change the vault location, the index will be rebuilt automatically against the new folder.
Recommended: create a dedicated folder just for VaultRAG,
for example ~/VaultRAG on macOS/Linux or
C:\Users\<you>\VaultRAG on Windows, and point the vault
path at that folder. Move or copy in only the documents you actually want
indexed. This keeps the vault focused, makes indexing faster, and gives you
a clean spot to back up or sync.
You can set the vault path to a broad location like your home directory, Documents folder, or an entire drive, but it is not recommended. VaultRAG will try to index everything it can reach underneath that path, including application data, caches, downloads, and other files you probably do not want to search. The result is a much larger index, slower scans and embedding runs, higher disk and memory use, and noisier search results.
Warning: Avoid pointing the vault at system folders (such
as /, /System, C:\Windows,
Program Files, or hidden config directories like
~/Library or AppData). Use a folder you own and
control, and ideally one you can back up on its own.
Appearance
The Appearance section controls how the VaultRAG window looks and behaves:
- Show window control buttons (close, hide, fullscreen): toggles the platform-native window buttons in the title bar. When enabled, macOS shows the standard traffic-light buttons and Windows shows its standard minimize, maximize, and close controls. When disabled, VaultRAG hides them for a cleaner, more minimal title bar; you can still show or hide the window using your global hotkey.
- Center main window when app launches or is shown by shortcut: when enabled, VaultRAG positions the main window in the middle of the screen each time the app starts or the global shortcut brings it forward.
- Minimal mode: hides extra chat chrome, tightens chat spacing, and makes the chat and vault surfaces more transparent for a more compact, distraction-free look.
- Theme and Font: choose from a wide range of built-in themes (Dark, Light, Catppuccin, Dracula, Nord, Tokyo Night, GitHub, and more) and pick the interface font. Both take effect immediately.
Global Hotkey
Launches VaultRAG from anywhere on your system. Click the field and press your preferred key combination to change it. On macOS, you need to grant VaultRAG permission under System Settings > Privacy & Security > Accessibility and Input Monitoring for the hotkey to work. Restart the app after changing these permissions.
Database Maintenance
Three tools to manage the vault's internal database:
- Verify checks for discrepancies between files on disk and the vault database without making changes.
- Repair syncs the database with the current state of files on disk, adding missing files and removing deleted entries while preserving existing AI-generated data.
- Rebuild performs a full clean and rebuilds the database from scratch.
Warning: Rebuild erases all AI-generated data including embeddings, summaries, and relationships. Only use it if Repair does not resolve the issue or you want a fresh start.
Vault Statistics
A snapshot of your vault showing embedding cache size, document count, categories, indexed folders, relationships, graph database size, and embedding dimensions. Click Refresh to update after making changes.
AI
The AI tab is where you configure your models and how VaultRAG uses them. It covers your cloud provider, the chat and embedding models, how search is tuned, local AI (models that run on your own computer), and web search. The same models you picked during setup can be changed here at any time.
Cloud provider and API key
Choose your Cloud Provider (OpenRouter) and paste your Cloud API Key. Cloud models only appear after a key is configured. If you run local AI instead, you do not need a key here — local models appear in the pickers once the LocalAI runtime is running.

Main model
The Main Model is what answers your questions in chat. Click Details to see its context window, max output, and pricing. Use Temperature to control how deterministic responses are (lower is more focused, higher is more creative) and Max Output Tokens to cap the length of a response. Test Connection verifies VaultRAG can reach the model.
Embedding model and source
The Embedding Model turns text into the vectors used for search. The Embedding Source controls what gets embedded:
- AI summary: VaultRAG generates a short summary of each document with the summary model, then embeds that summary. Best search quality, but it requires a summary/chat model.
- Document text: embeds the document text directly. Faster, especially with local models, and does not use the summary model.
The Summary Model is the optional model used to write those per-document summaries. Pick a faster, cheaper, or local model for this task.
Search tuning
These settings control how strict and how broad vault search is. They are advanced and the defaults work well, but you can adjust them if search returns too few or too many results.

- Similarity Threshold: the minimum similarity score a result must meet. Lower returns more results, higher means stricter matching.
- Dynamic Threshold: when enabled, if no results are found VaultRAG progressively lowers the threshold until results are found or the minimum is reached.
- Minimum Threshold, Decrement Percentage, and Max Tries: the lowest threshold to try before falling back to text search, how much to lower the threshold each attempt, and the maximum number of attempts.
- Max Search Results: the maximum number of results returned from embedding search, which also limits how many are sent to the AI model. Set to 0 for unlimited.
Local AI
VaultRAG can run models entirely on your own computer so nothing leaves your machine. Express Local AI Setup — the Set up local AI for me button — installs the recommended local chat and embedding models for this computer, enables GPU acceleration when available, and applies local-first defaults in one click. This overwrites your current AI provider, embedding, and indexing settings.

LocalAI runtime
Use Start, Stop, and Restart
to control the local runtime. When it is running, your installed local models
become available in the model pickers above. The panel shows the runtime state,
its local address, capabilities (chat, summaries, embeddings), and where models
are stored. Minutes idle before unloading controls how long
models stay in memory after use; set it to 0 to keep them loaded
until you stop the runtime or use Unload Models Now.
Advanced performance
The Advanced Performance options tune the local runtime's launch settings for your hardware. On Windows NVIDIA systems you can install the CUDA Runtime for GPU acceleration. Model Storage sets where helper models are downloaded. The Performance preset (Auto recommended) fills in the launch fields for you, and you can override individual values such as context size, GPU layers, batch and micro-batch size, flash attention, and KV cache types. Changes take effect after you unload or restart LocalAI. If a setting causes startup problems, return the preset to Auto and reset the numeric fields to their defaults.
Local models
The LocalAI Models list is where you install models to this computer and then select them in the pickers above. Each entry shows its size, what it can be used for (chat, summary, tools, reasoning, long context), and its format. Badges tell you whether a model is already Installed and whether it Fits this computer; models that need more memory than you have are flagged with a memory-risk warning. Use Install, Remove, and Details to manage them, and Refresh List to update the catalog.

Web Search
Choose how VaultRAG performs live internet lookups when web search is enabled in chat. The Web Search Provider can be Tavily or, for OpenRouter chat models, OpenRouter's own server-side web search. Tavily works with both local and cloud models that support tool calling, and is required for web search when you run local AI, since local providers do not include a search backend.
Get a free Tavily API key at tavily.com, paste it into Tavily API Key, and click Test Tavily to verify the connection. Search Depth chooses between basic (faster) and advanced (deeper crawling), and Max Results sets how many web results to return per search (Tavily is capped at 20; OpenRouter allows up to 25).
Indexing
The Indexing tab controls how VaultRAG generates summaries and manages the prompts used for AI processing.

Summary Settings
Toggle Automatically Generate Summary When Adding Files to have summaries created with AI as soon as files are added to the vault; disable it if you prefer to index files manually later. The remaining options tune summary generation:
- Max Summary Source Characters: the maximum number of characters read from each document when generating a summary. Higher values can improve summaries but use more tokens. This does not limit indexed file size or how much is sent to the model during chat.
- Parallel Summary Generation: how many documents are summarized at once during bulk imports (1–10). Higher is faster but may hit API rate limits.
- Request Timeout (minutes): how long to wait for an LLM request before giving up (1–90). Increase it for deep-research models or complex tasks.
System Prompts
Manage the saved system prompts that guide how the AI responds during chat. Built-in prompts are updated automatically, while custom prompts you create are preserved. Use New, Duplicate, and Delete to manage them, or Reset to Default to restore the built-in version.
Summary Prompts
Manage the saved prompts used when generating document summaries. This controls what the AI focuses on when summarizing your files, and works the same way as system prompts — built-in prompts update automatically and your custom ones are preserved.
Files
The Files tab controls how files are handled when added to the vault and lets you define ignore rules and custom file type mappings.

Add Behavior
Toggle Move files into the vault when adding to control whether Add Document and Add Folder move items into the vault folder, or leave them in their original location and copy them in.
File Ignore Rules
Define patterns to exclude files and folders from the vault database entirely
— they will not appear in the vault browser, search, or chat. Each rule has
a pattern and a match type: Starts With (for prefixes like
~$), Ends With (for extensions like
.tmp), Contains, or Equals (for
specific directories like node_modules). Use
Reset to Defaults to restore the built-in rules.
File Type Mappings
Extensions listed here are treated as text files, so source code and other
text-based files can be parsed and indexed. Enter an extension (for example
.py, .go, or .rs) and click
Add. Reset to Defaults and
Clear All manage the list.
About
The About tab shows the current version of VaultRAG and provides access to the EULA, update checks, and troubleshooting tools.

EULA
View the End User License Agreement and notices.
Check for Updates
Click to check whether a newer version of VaultRAG is available.
Troubleshooting
Open the log folder to access diagnostic logs. Useful if you need to report an issue or debug unexpected behavior.
Chat
The chat interface is where you ask questions, search your vault, and interact with AI. Results from your vault and the web are displayed inline alongside the AI's response.
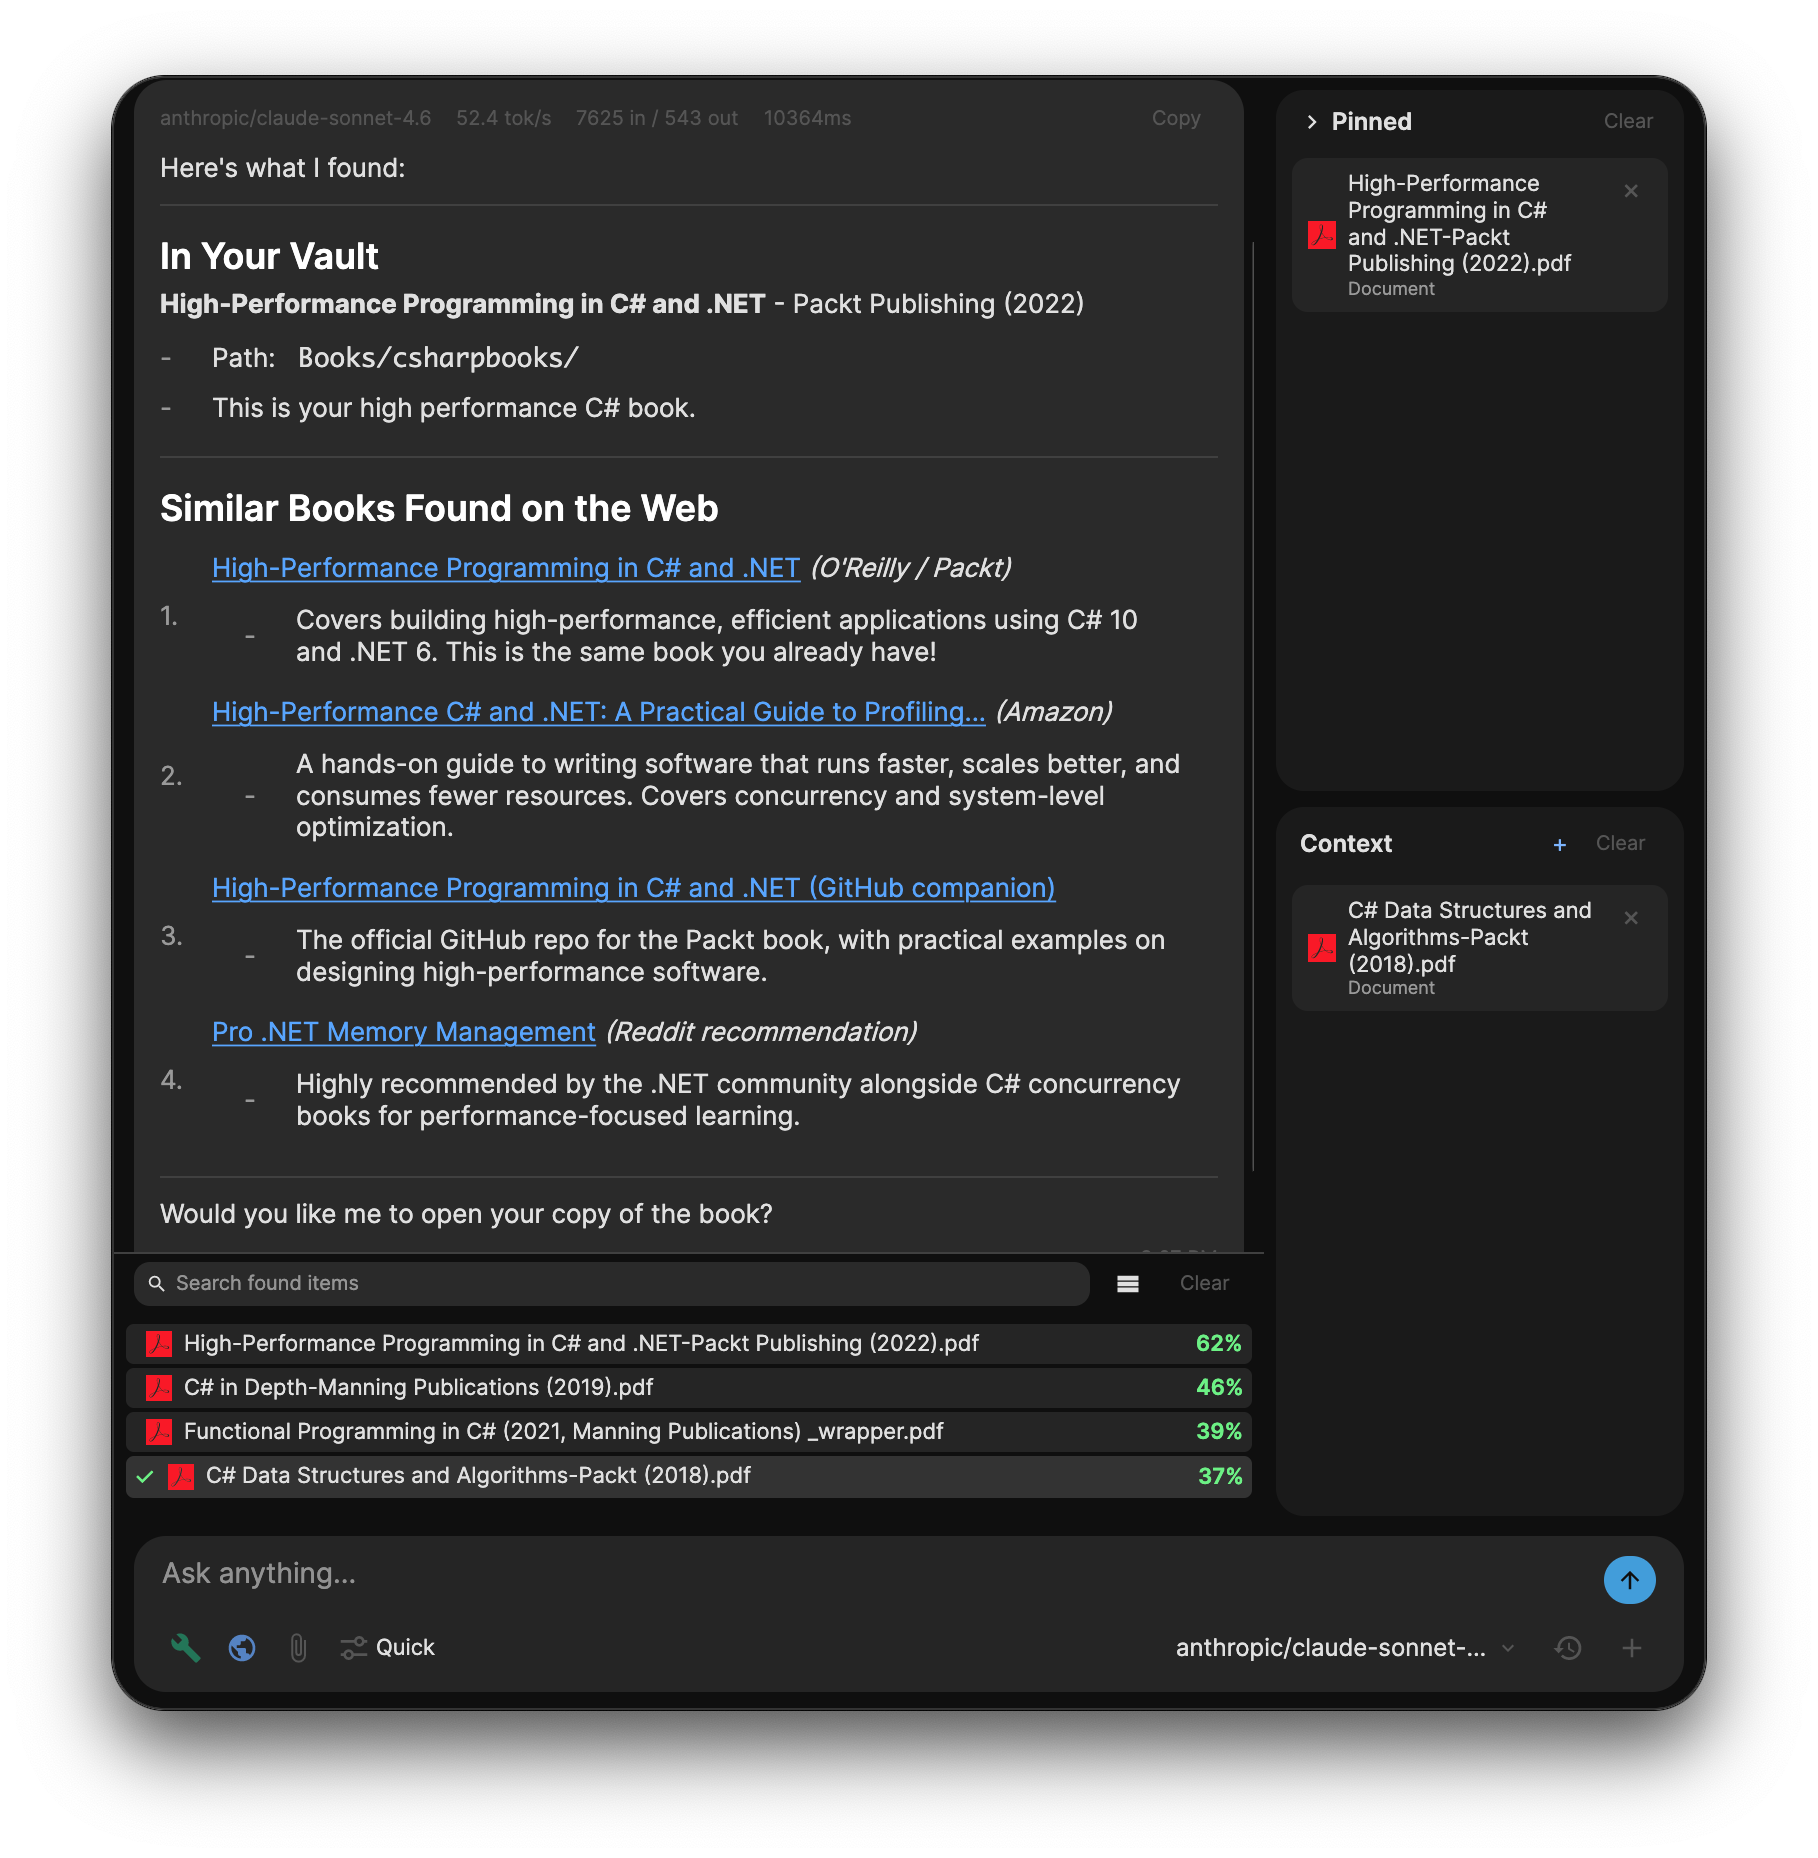
Vault Search Results
When you ask a question, VaultRAG searches your indexed documents and returns relevant matches under In Your Vault. Each result shows the document name, match score, and a link to open the file.
Web Search Results
If web search is enabled, the AI can also pull in live results from the internet. These appear under Best Books Available (Web Results) or similar headings depending on your query, giving you both local and online sources in one response.
Pinned Documents
Pin documents to the right sidebar so they stay accessible across your conversation. Pinned documents remain in context as you ask follow-up questions, making it easy to work through a set of files throughout the day.
Context Panel
The context section on the right shows documents currently loaded into the conversation. This gives you visibility into exactly what the AI is referencing when it answers your questions.
Chat Input
The input bar at the bottom includes controls for toggling web search, attaching files, viewing conversation history, selecting your AI model, and starting a new conversation.
Vault
The vault is your file manager inside VaultRAG. Browse folders, import documents, and generate AI summaries without leaving the app.
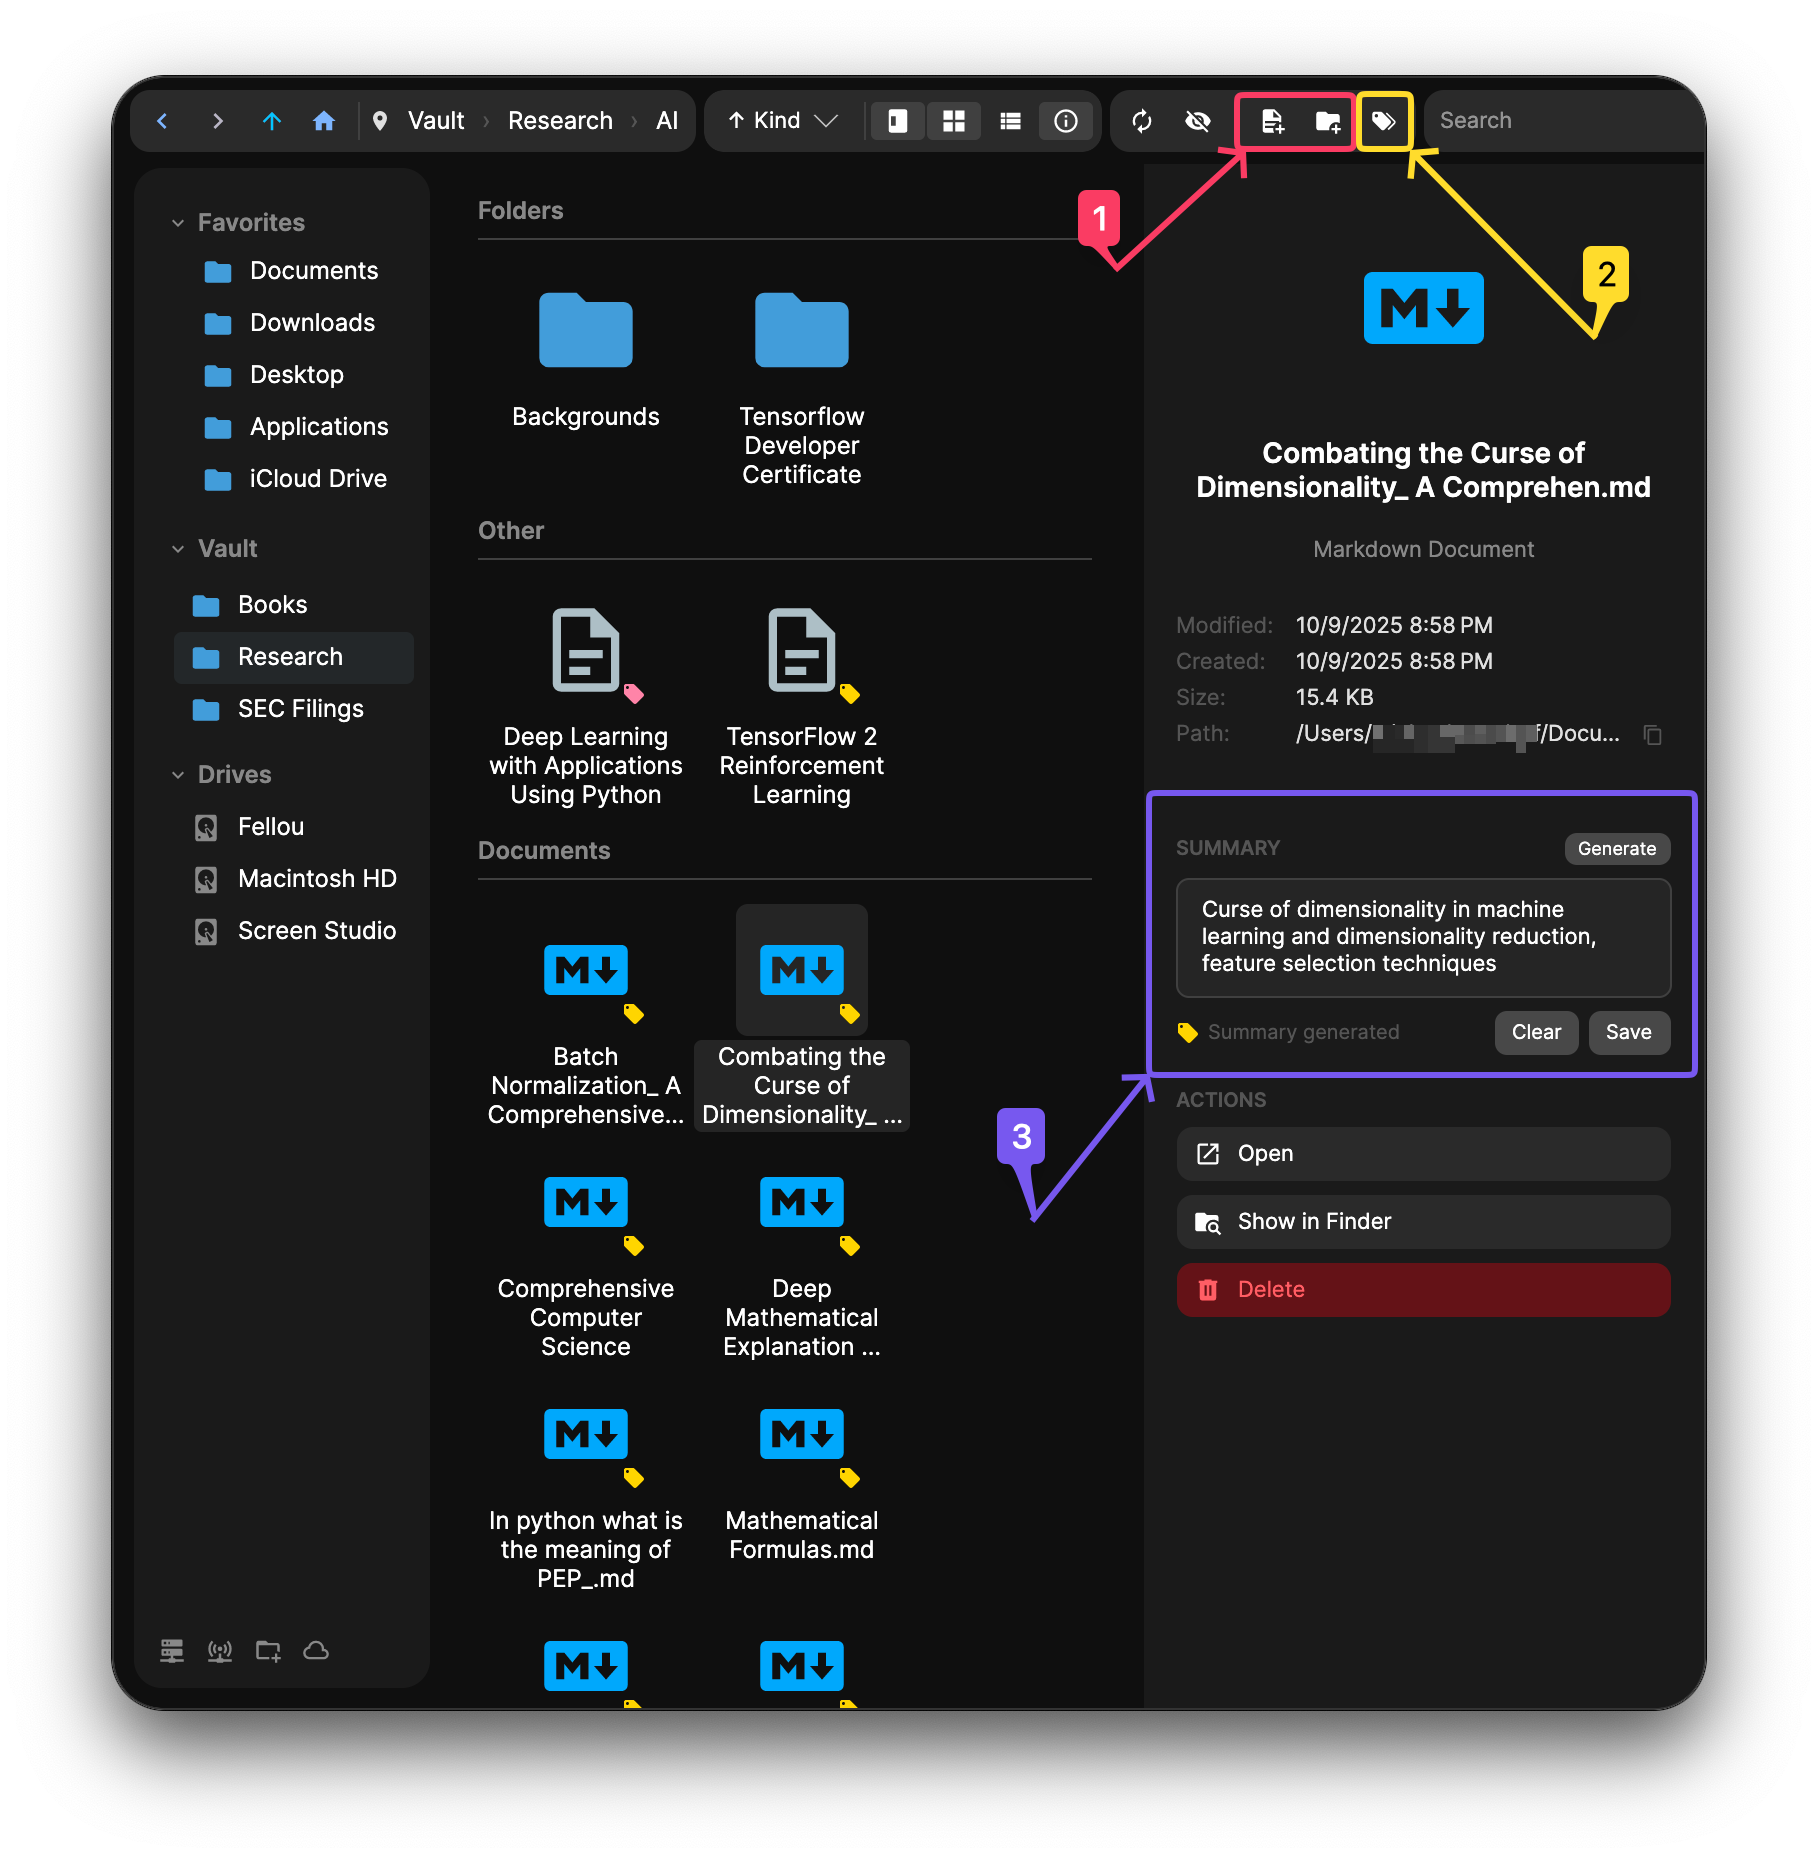
Importing Files 1
The highlighted import buttons (1) open a picker for adding files or whole folders into the current vault location. You do not have to use them though - the vault accepts files however you normally move them around your computer:
- Copy and paste with Cmd+C / Cmd+V (or Ctrl on Windows) from Finder, Explorer, or another vault folder.
- Right-click in the grid for a context menu with paste, new folder, and other actions.
- Drag and drop files or folders straight into the grid from any other application, or drag them out of the vault into another location.
Generate Summaries 2 3
The highlighted toolbar button (2) fills in missing AI summaries across the entire vault. If summary generation on import is enabled in Settings, newly imported files are summarized automatically, so most users only need this button when summaries were skipped, disabled, or missing. Summaries power semantic search and make the detail panel more informative.
For a single file, select it and use the Summary panel on the right (3). Click Generate to create a summary for just that file. You can also edit the summary text by hand and click Save to keep your own wording, or Clear to remove the summary entirely. Saved summaries are stored per file and used by search and chat.
Folder Sidebar
The left sidebar shows your folder hierarchy with pinned folders at the top for quick access. The Drives section lists mounted volumes so you can browse outside the vault root when you need to.
Document Details
Select a file to open the detail panel on the right. It shows the file type, size, modified and created dates, full path (with a copy button), and the AI-generated summary. The Actions group at the bottom lets you Open the file in its native application, Show in Finder, or Delete it.
Toolbar
The toolbar across the top of the vault holds navigation, view, and action controls. From left to right: back, forward, up, and home for moving through the folder tree; breadcrumbs showing your current path; a sort menu; grid, list, and column view toggles; an info-panel toggle; refresh; a hide-indexed filter; and the import and tag controls covered above. The search box on the right searches filenames and indexed content across the current folder.
You can also customize the toolbar. Use the toolbar options menu to hide buttons you do not use, add them back later, show all toolbar items, hide optional buttons, or reset the toolbar to its default layout. If you prefer the window controls in the toolbar, turn on Show Window Controls in Toolbar. The same window-control setting is also available from Settings.

Analytics
The Analytics dashboard tracks your AI usage so you always know what you are spending. Open it from the menu inside the app.
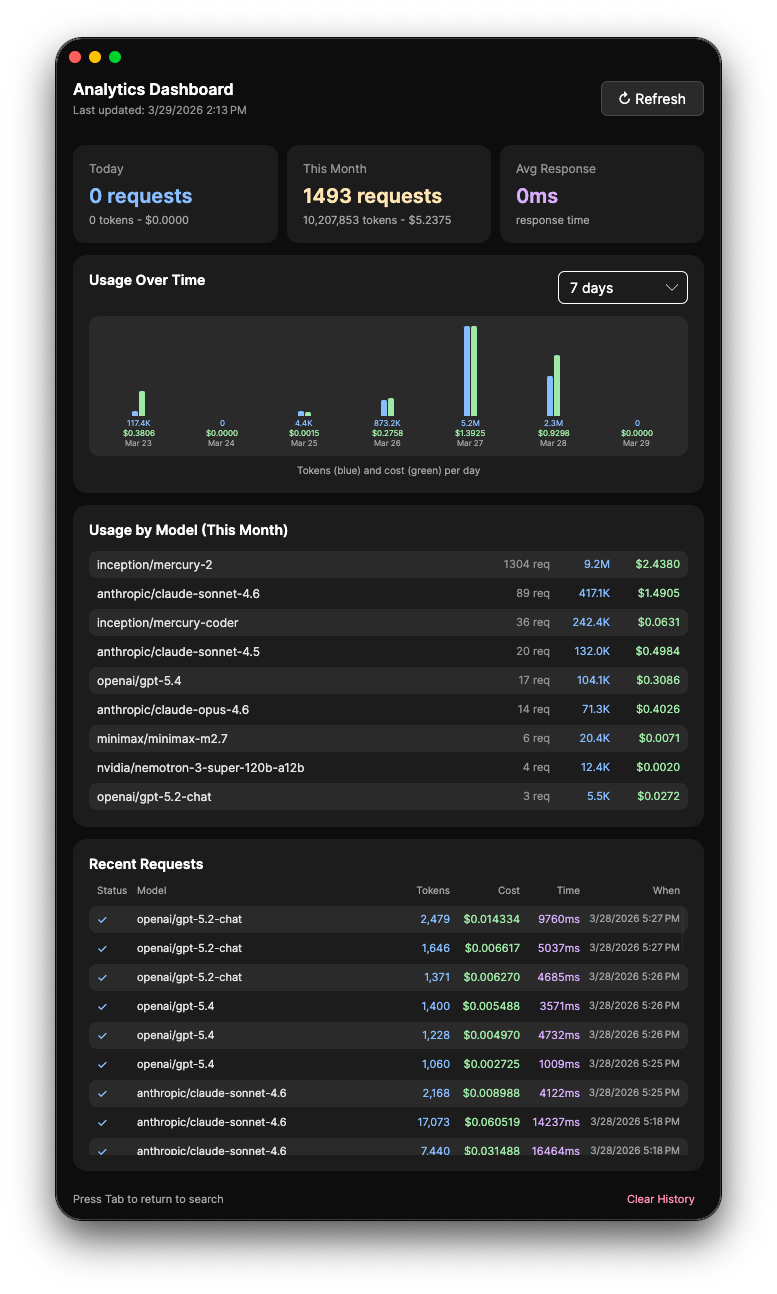
Today and This Month
Summary cards at the top show request counts, token usage, and cost for today and the current month at a glance.
Usage Over Time
A chart showing daily token usage and cost over a configurable time range (7 days, 30 days, etc.) so you can spot trends in your spending.
Usage by Model
A breakdown of every model you have used this month, showing request count, total tokens, and cost per model. Useful for understanding which models are driving your spending.
Recent Requests
A log of individual AI requests with the model used, token count, cost, response time, and timestamp. Filter by keyword to find specific requests.